Embedded Computing
  • About
  • Blog
  • Hardware
    • Which Platform?
    • Controller Platforms >
      • Adafruit Platform
      • Arduino Plaform
      • BBC micro:bit
      • Espressif Platform
      • iLabs Platform
      • Raspberry Pi Platform (MCU)
      • Seeed Platform
      • Silicon Labs Platform
      • Teensy Plaform
    • Computer Platforms >
      • BeagleBone Platform
      • Raspberry Pi Platform (SBC)
      • UDOO Platform
    • Peripherals >
      • Shields
      • Grove System
      • Sensors
      • Actuators
    • Displays >
      • E-Paper Displays
      • Reflective Displays
      • TFT Displays
      • LCD Displays
    • Legacy Platforms >
      • chipKIT Plaform
      • 4D Systems Platform
      • Intel Platform
      • LaunchPad Plaform
      • BoosterPacks for LaunchPads
      • LightBlue Bean
      • Maple Plaform
      • Mediatek Platform
      • Microsoft Azure IoT DevKit
      • Particle Platform
  • Software
    • Exploring RTOS with Galaxia >
      • Event Library
      • Semaphore Library
      • Mailbox Library
      • Timer Library
      • Clock Library
      • SWI Library
      • Task Library
    • Ultra-Low Power with EnergyTrace >
      • Ultra-Low Power with MSP430
      • Ultra-Low Power with Energia MT and Galaxia
    • Using Integers Instead of Reals
    • Going Python?
  • IoT
    • IoT Platforms: Which Hardware? >
      • Matter with Silicon Labs MG24
    • IoT Services: Which Solution? >
      • Recommended IoT Solutions
      • Platform-Specific IoT Solutions
      • Other IoT Solutions
      • Not tested IoT Solutions
      • Notification Solutions
    • Get Date and Time from Internet with NTP
    • Fast and Easy WiFi Connection with QR-Code
  • Tools
    • How to Start?
    • Reference >
      • Asking for Help
      • Boards Pins Maps
      • Ruler
      • Boards and Plugs
      • I²C Logic Level Converter
      • Standards for Connectors
    • Training >
      • Texas Instruments Workshops
      • Embedded Systems: Shape The World — MOOC edX UTAustinX UT.6.02x
      • Embedded Systems - Shape The World: Microcontroller Input/Output — MOOC edX UTAustinX UT.6.10x
      • Embedded Systems - Shape The World: Multi-Threaded Interfacing — MOOC edX UTAustinX UT.6.20x
      • Real-Time Bluetooth Networks: Shape the World — MOOC edX UTAustinX UT.RTBN.12.01x
      • Systems Thinking with Texas Instruments Robotics System Learning Kit
    • Books >
      • Getting Started with the MSP430 LaunchPad
      • Getting Started with Arduino
      • Arduino Cookbook
    • IDE >
      • The Battle of IDEs
      • More Options
      • Assessing the Next Generation of IDEs
      • Tools for Documentation
    • Equipment >
      • Saleae Logic Analyser
      • Rigol DS1102E Oscilloscope
      • XDS110 Debug Probe with EnergyTrace​
      • Segger J-Link Programmer-Debugger
      • Nordic Power Profiler Kit II
  • Projects
    • Libraries >
      • Master I²C Software Library
      • Date and Time Library
      • highView Library Suite
      • Others Libraries
    • smartDevices >
      • I²C smartColours Smart Sensor
      • I²C smartRFID Smart Sensor
      • I²C smartLED Display
      • I²C smartControls Smart Device
      • I²C smartWiFi Smart Device
      • I²C smartBLE Smart Device
      • I²C smartNode Smart Device
    • IoT Projects >
      • Remote E-Paper Weather and Message Board
      • Typie-Walkie with LoRa and E-Paper Screen
      • Typie-Walkie with E-Paper Screen
      • Remote e-Paper Pictures Panel
      • Remote e-Paper Messages Panel
      • Industrial IoT Project
      • Remote Contactless Temperature Monitor
      • Using Node-RED for IIoT
      • Low Power Home Network Weather Monitoring
      • Updated Low Power Home Network Weather Monitoring
      • Weather and Security Station with Blynk
      • SensorTag to Blynk Using Node-RED
      • Pervasive Reporting
    • AI Projects >
      • Colour Recognition with Neural Network
    • Other Projects >
      • Air Quality Monitoring
      • Driving a Large E-Paper Display with a Compact Xiao RP2040
      • Low-Power E-Paper Weather Station
      • Portable Particulate​ Matter Monitor
      • FRAM-based E-Paper Screen Controller
      • General Purpose 3.5" Screen
      • Colour Recognition with Neural Network
      • A Low Power Weather Station
      • Digital Volt-Amp-Watt Meter
      • Mobile Measurement with LCD Display
      • Screen with SRAM for GUI
      • Volt-Amp-Watt-Meter for Grove
      • Multi-Touch Project with CapTIvate

Weather and Security Station with Blynk

This commented project is an introduction to the different elements provided by Blynk in a real application
Blynk has launched a new version of their service. The version this project relies on is no longer available, except with a local server.
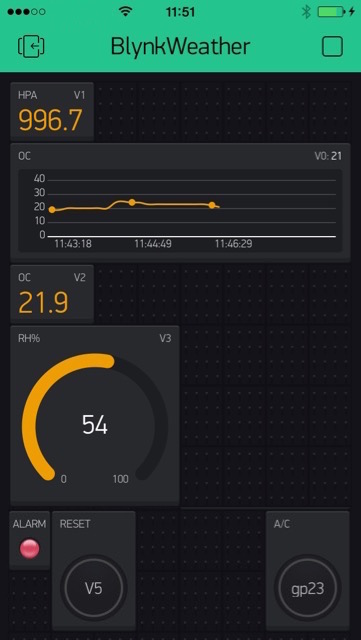
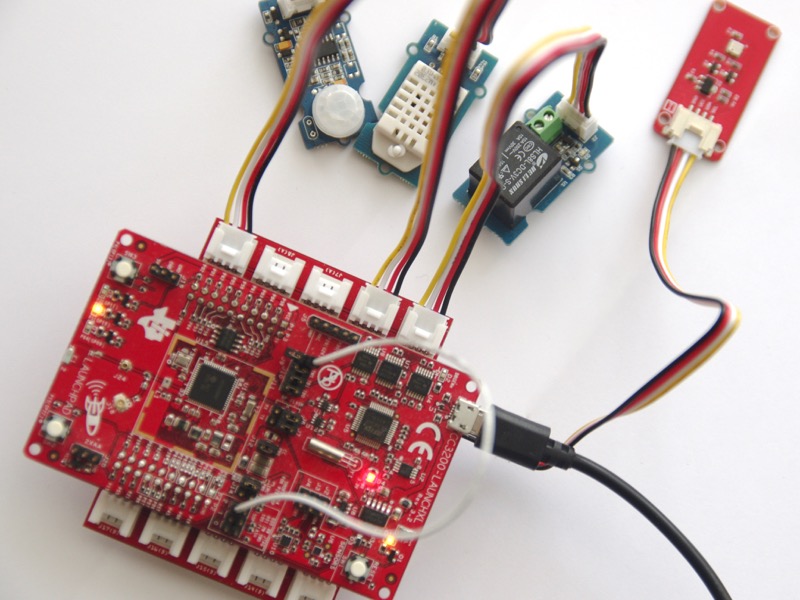
The project includes a LaunchPad CC3200, a Grove BoosterPack, and  the following Grove modules: a BMP180 barometer and thermometer, a DHT hygrometer and thermometer, a PIR sensor and a relay.

On the Blynk application, I've defined 6 virtual pins and one digital output pin, listed below:
  •  V0    temperature from BMP180, read
  •  V1    pressure from BMP180, read
  •  V2    temperature from DHT, read
  •  V3    humidity from DHT, read
  •  V4    alarm LED, read
  •  V5    reset from remote, write
  • D23  A/C relay
Picture

Prepare the Hardware

The hardware includes a LaunchPad CC3200 and a Grove BoosterPack with 4 elements: 
  • a PIR detector (input pin 27), 
  • a DHT22 temperature and humidity sensor (input pin 24), 
  • a BMP180 pressure sensor (I²C port) and 
  • a relay (output pin 23).

​The Grove system makes connections very easy. Just plug and play!
Picture

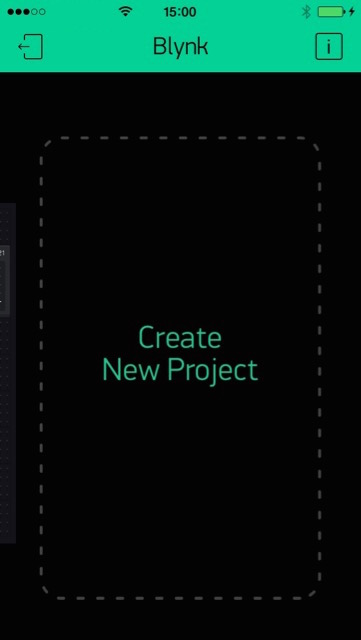
Create a New Project

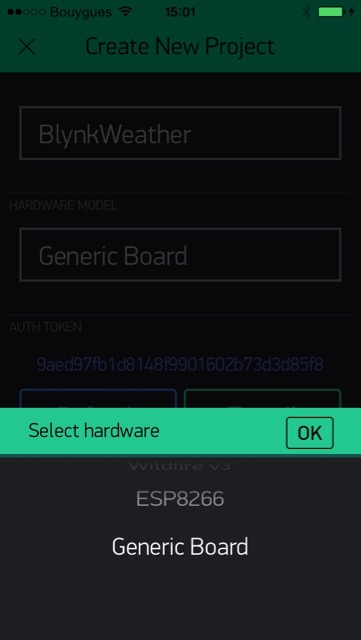
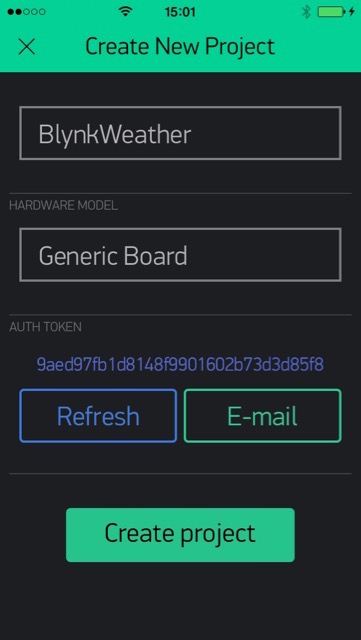
Create a new project, select the board as Generic Board and name it. 

E-mail the authorisation string and copy-paste it on the project.
Picture
Picture
Picture

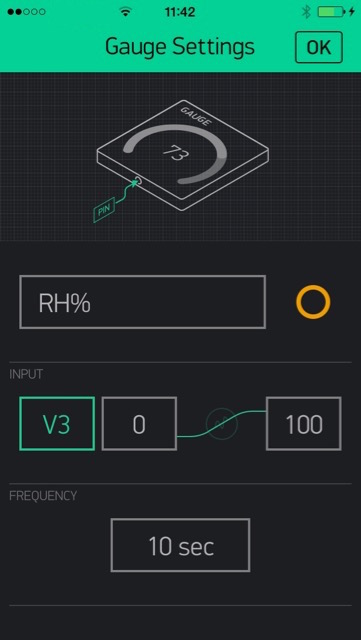
Add the Displays for Temperature, Pressure and Relative Humidity

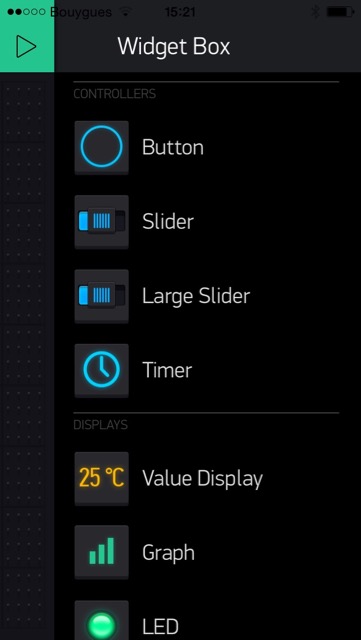
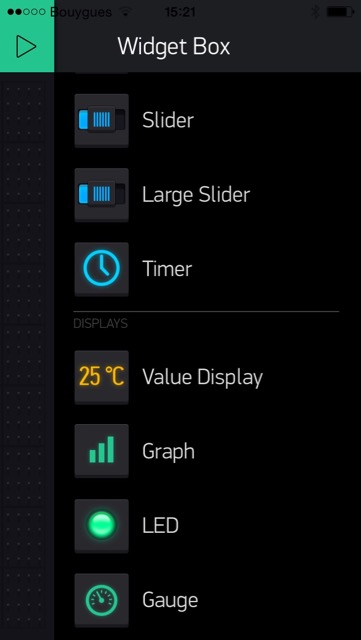
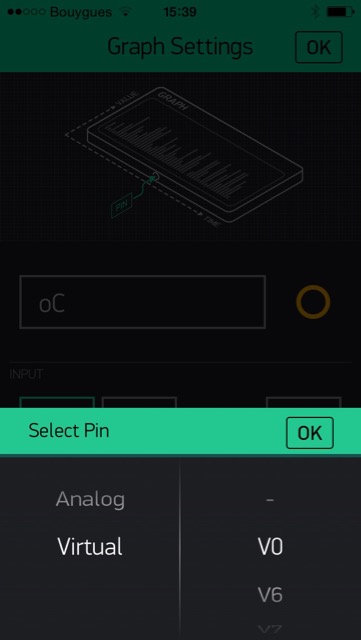
For each element, select it from the list.

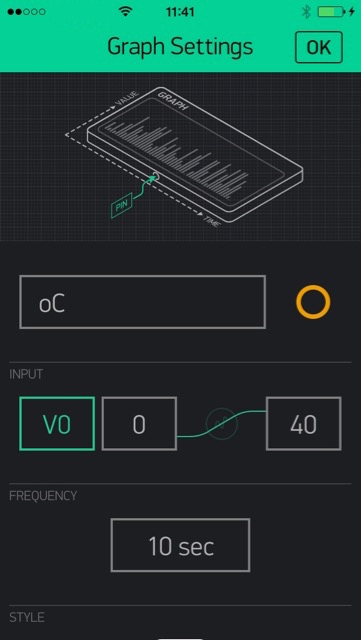
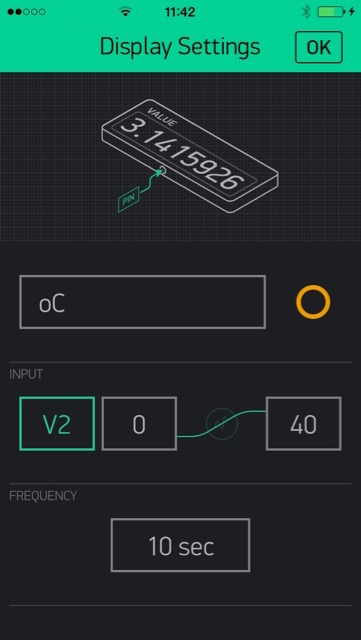
A new pane appears. Name the element (here oC).
Picture
Picture
Picture
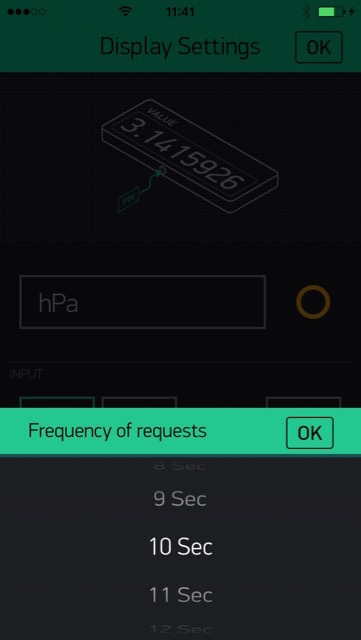
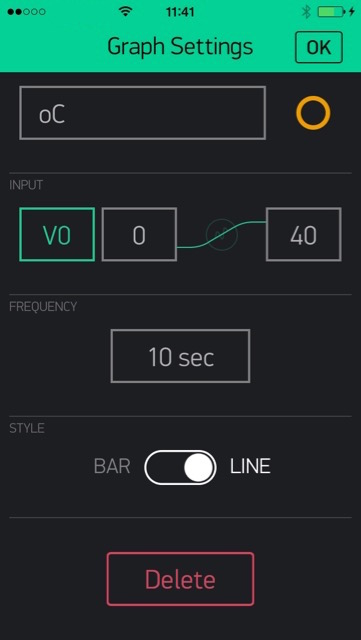
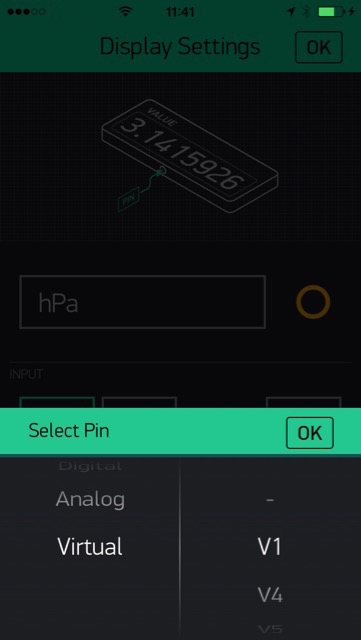
Associate the element to a pin (here V0 for virtual 0), set the minimum and maximum (here 40), set the frequency (here every 10 seconds) and choose the option (here Line). 

Finally, press OK to add it to the project.
Picture
Picture
Picture
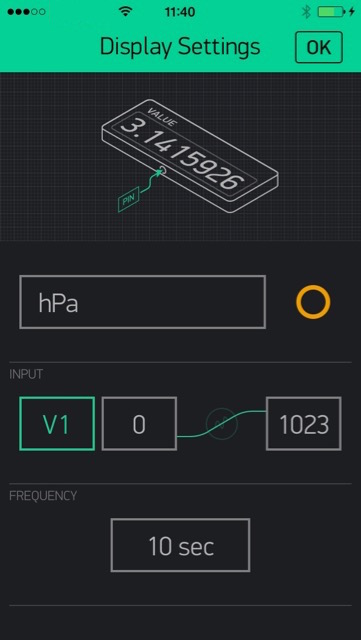
Do the same for the pressure with virtual pin V1.
Picture
Picture
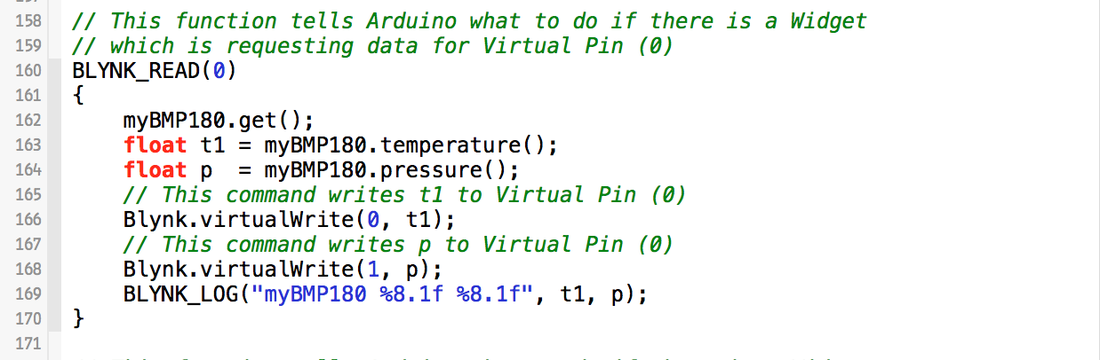
On the sketch, the code uses the BLYNK_READ() function. 

The function is called by the application on the iPhone, reads the data from the BMP180 sensor, and sends the two values, temperature to virtual 0 and pressure to virtual 1.


Picture
Same definitions of the elements on the interface for the data from the DHT sensor, with  temperature to virtual 2 and pressure to virtual 3.

Similar BLYNK_READ() function on the sketch applies for the DHT sensor, with temperature to virtual 2 and relative humidity to virtual 3.

Picture
Picture

Add the Alarm LED and the Reset Push Button

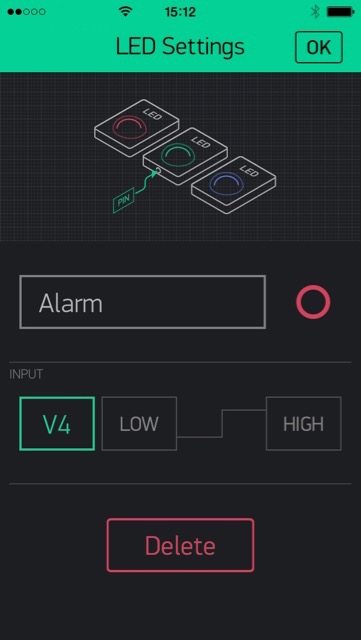
The LED turns red and stays on when the alarm is detected by the PIR sensor.

Select the LED element and associate it to the V4 virtual pin.
Picture
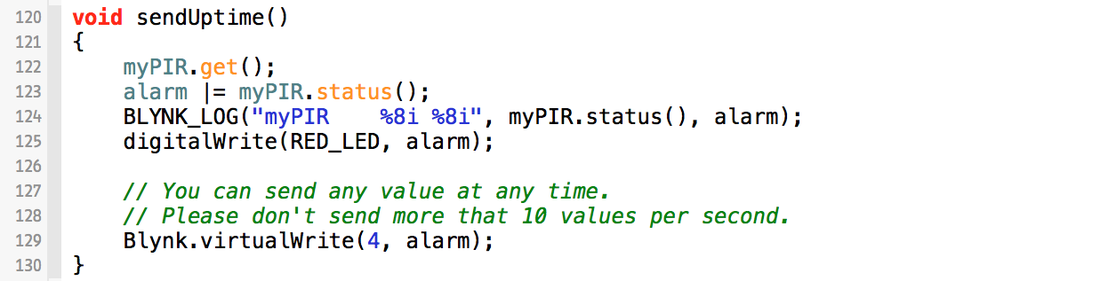
The PIR sensor is checked every second. If an intrusion is detected, the red LED on the board is turned on and the alarm flag raised accordingly. 

The value of the alarm flag is sent to virtual pin 4.
Picture
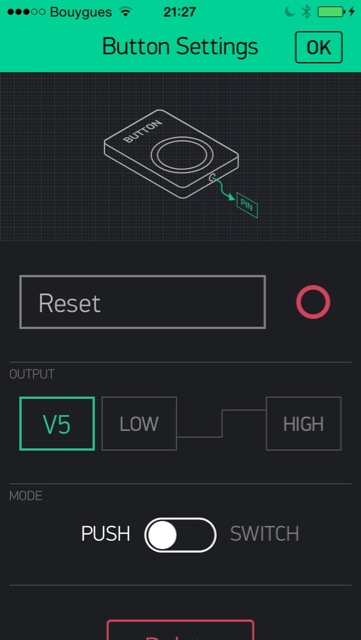
The RESET button is a push button and sends a message to virtual pin 5.
Picture
On the sketch, the code uses the BLYNK_WRITE() function.

The function is called by the application on the iPhone and reads the  state of the button from virtual 5, then clears the alarm flag if true.
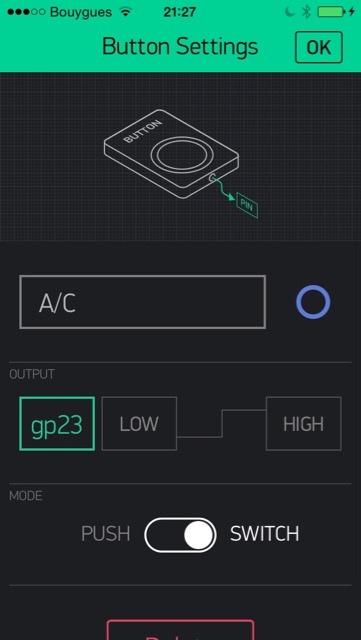
Picture

Add the A/C Switch

The A/C button is a switch button associated with digital pin 23. The signal on pin 23 drives the relay. Select blue as colour of the button.
Picture
This application can also run on a local server, for example a BeagleBone. Check out the Private IoT with Blynk on Local Server.

Download

  • Blynk for LaunchPad CC3200 library
  • BMP180, DHT and PIR are standard libraries
  • Main sketch on the right
blynkweather.ino
File Size: 3 kb
File Type: ino
Download File

Powered by Create your own unique website with customizable templates.