Embedded Computing
  • About
  • Blog
  • Hardware
    • Which Platform?
    • Controller Platforms >
      • Adafruit Platform
      • Arduino Plaform
      • BBC micro:bit
      • Espressif Platform
      • LaunchPad Plaform
      • Microsoft Azure IoT DevKit
      • Seeeduino Platform
      • Teensy Plaform
    • Computer Platforms >
      • BeagleBone Platform
      • Mediatek Platform
      • UDOO Platform
    • Legacy Platforms >
      • chipKIT Plaform >
        • chipKIT Uno32 and uC32
        • chipKIT WF32 and WiFire
        • Compatibility
        • chipKIT PGM Programmer-Debugger
        • 4D Systems PICadillo-35T
        • Shields for chipKIT Uno32
        • 4D Systems Platform >
          • 4D Systems PICadillo-35T
          • 4D Systems gen4-IoD-28T
      • Cosa, an Alternative Framework for AVR Boards
      • DFRobot Platform >
        • DFRobot BLuno
        • DFRobot Wido
      • Digistump Platform >
        • Digispark
        • Oak
      • Intel Platform >
        • Intel Curie with Neural Network
        • Intel Edison
      • LightBlue Bean
      • Little Robot Friends
      • Maple Plaform >
        • LeafLabs Maple
      • Microduino Plaform >
        • Microduino
      • Particle Platform >
        • Particle Core
        • Particle Photon
        • Particle Tools
      • Protostack Platform >
        • Protostack Boards
      • RedBear Platform >
        • RedBearLab CC3200
        • RedBearLab WiFi Mini
        • RedBear Duo
      • Wiring Plaform >
        • Wiring S
        • Wiring Play Shield
    • Boards and Plugs
    • I²C Logic Level Converter
    • Peripherals >
      • BoosterPacks for LaunchPads
      • Shields
      • Grove System
      • Ten Years with the Grove System
      • Sensors
      • Actuators
    • Displays >
      • Pervasive Displays e-Paper Screens
      • FRAM-based E-Paper Screen Controller
      • The 2.8" HY28A LCD Screen
      • High-Definition 480x320 3.5" Screen With Touch and Fonts
      • Kentec 3.5" LCD SPI with Touch BoosterPack
      • 4D Systems Intelligent Screens
      • East Rising 5" LCD with RA8875, Touch, Fonts, Flash and SD-card
      • East Rising 5" LCD with SSD1963, Touch, Flash and SD-card
  • Software
    • The IDE Question >
      • The Battle of IDEs
      • More IDE Options
      • Looking for a Better IDE
      • Assessing the Next Generation of IDEs
    • Exploring RTOS with Galaxia >
      • Event Library
      • Semaphore Library
      • Mailbox Library
      • Timer Library
      • Clock Library
      • SWI Library
      • Task Library
    • Ultra-Low Power with EnergyTrace >
      • Ultra-Low Power with MSP430
      • Ultra-Low Power with Energia MT and Galaxia
    • Using Integers Instead of Reals
  • IoT
    • IoT Platforms: Which Hardware?
    • IoT Services: Which Solution? >
      • Recommended IoT Solutions
      • Platform-Specific IoT Solutions
      • Other IoT Solutions
      • Not tested IoT Solutions
      • Notification Solutions
    • Get Date and Time from Internet with NTP
    • Fast and Easy WiFi Connection with QR-Code
  • Tools
    • How to Start?
    • Reference >
      • Asking for Help
      • LaunchPad and BoosterPack Boards Pins Maps
      • Ruler
      • Standards for Connectors
    • Training >
      • Texas Instruments Workshops
      • Embedded Systems: Shape The World — MOOC edX UTAustinX UT.6.02x
      • Embedded Systems - Shape The World: Microcontroller Input/Output — MOOC edX UTAustinX UT.6.10x
      • Embedded Systems - Shape The World: Multi-Threaded Interfacing — MOOC edX UTAustinX UT.6.20x
      • Real-Time Bluetooth Networks: Shape the World — MOOC edX UTAustinX UT.RTBN.12.01x
      • Systems Thinking with Texas Instruments Robotics System Learning Kit
    • Books >
      • Getting Started with the MSP430 LaunchPad
      • Getting Started with Arduino
      • Arduino Cookbook
    • IDEs >
      • Texas Instruments Code Composer Studio 6
      • Texas Instruments Code Composer Studio Cloud
      • Energia
      • Tools for Documentation
    • Equipment >
      • Saleae Logic Analyser
      • Rigol DS1102E Oscilloscope
      • XDS110 Debug Probe with EnergyTrace​
      • Segger J-Link Programmer-Debugger
    • The 404 Collection
  • Projects
    • Libraries >
      • Master I²C Software Library
      • Date and Time Library
      • LCD_screen Library Suite
      • Others Libraries
    • smartDevices >
      • I²C smartColours Smart Sensor
      • I²C smartRFID Smart Sensor
      • I²C smartLED Display
      • I²C smartControls Smart Device
      • I²C smartWiFi Smart Device
      • I²C smartBLE Smart Device
      • I²C smartNode Smart Device
    • IoT Projects >
      • Industrial IoT Project
      • Remote Contactless Temperature Monitor
      • Using Node-RED for IIoT
      • Low Power Home Network Weather Monitoring
      • Updated Low Power Home Network Weather Monitoring
      • Weather and Security Station with Blynk
      • SensorTag to Blynk Using Node-RED
      • Pervasive Reporting
    • AI Projects >
      • Colour Recognition with Neural Network
    • Other Projects >
      • Portable Particulate​ Matter Monitor
      • FRAM-based E-Paper Screen Controller
      • General Purpose 3.5" Screen
      • Colour Recognition with Neural Network
      • A Low Power Weather Station
      • Digital Volt-Amp-Watt Meter
      • Mobile Measurement with LCD Display
      • Screen with SRAM for GUI
      • Volt-Amp-Watt-Meter for Grove
      • Multi-Touch Project with CapTIvate

IoT OTG with iOS and Android Blynk App and Arduino Library

Blynk leverages the touch-screen of a smartphone to provide a nice interface to control a board remotely. Blynk consists on two main elements:
  • an application running on iOS and Android,
  • a library compatible with the Wiring / Arduino framework with a set of configured boards.

Blynk was launched as a successful Kickstarter campaign last February 2015. Blink is the perfect solution for Internet of Thing on-the-go!
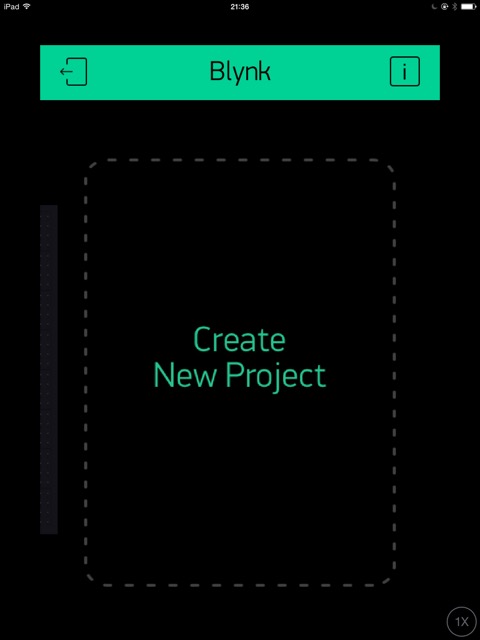
Draw the Interface

A project is a screen populated with widgets. 

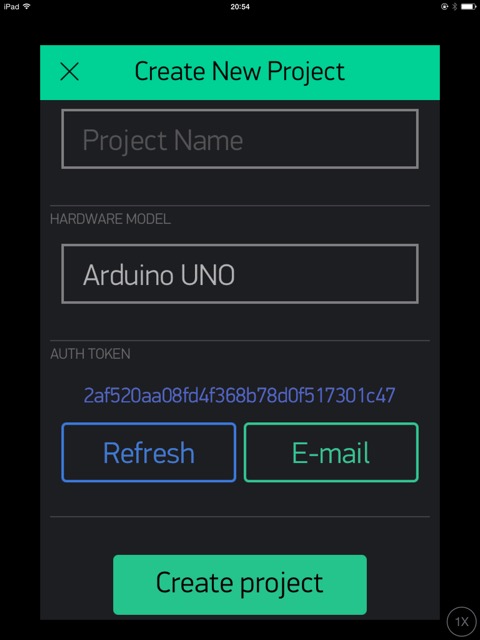
When creating a new project, provide the name and select the board. 

The application generates an authentication token and can even send it by e-mail.
Picture
Picture
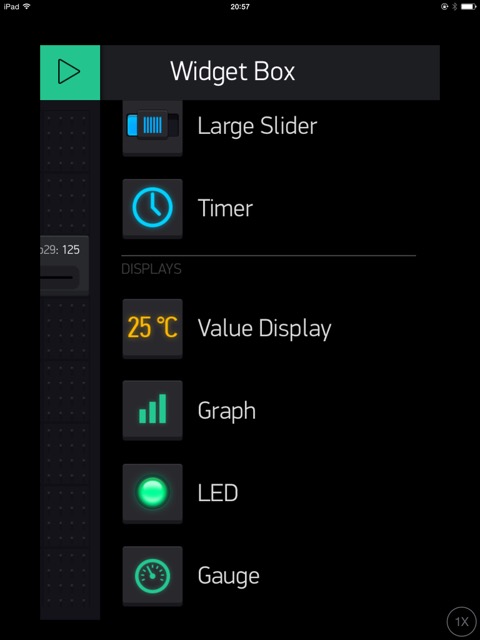
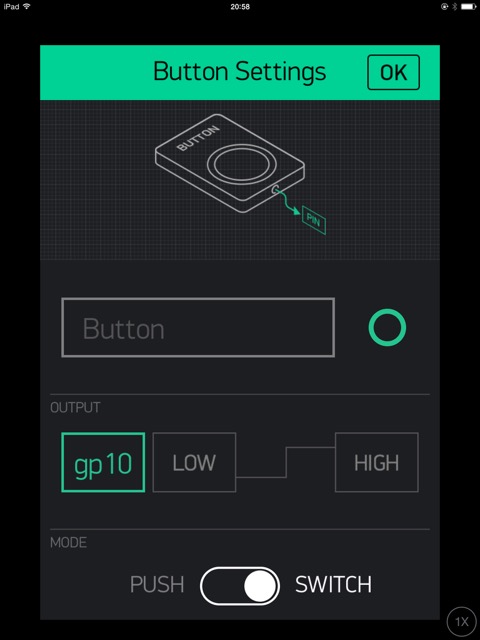
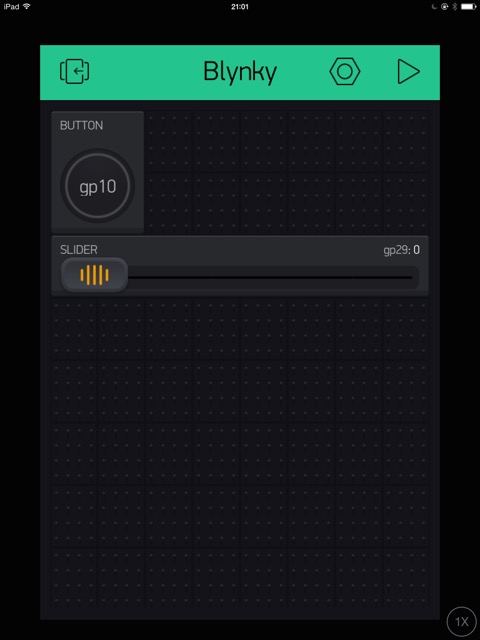
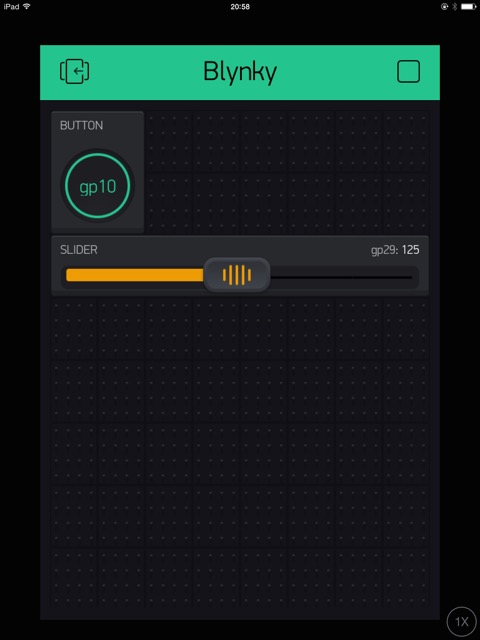
To add a widget, select one from the list, name it and assign a pin.

Pins can be digital, analog or virtual. The virtual pins is a smart way to 

On this example, I've selected a switch button to control the green LED on pin 10 and a slider to control the red LED on PWM mode.
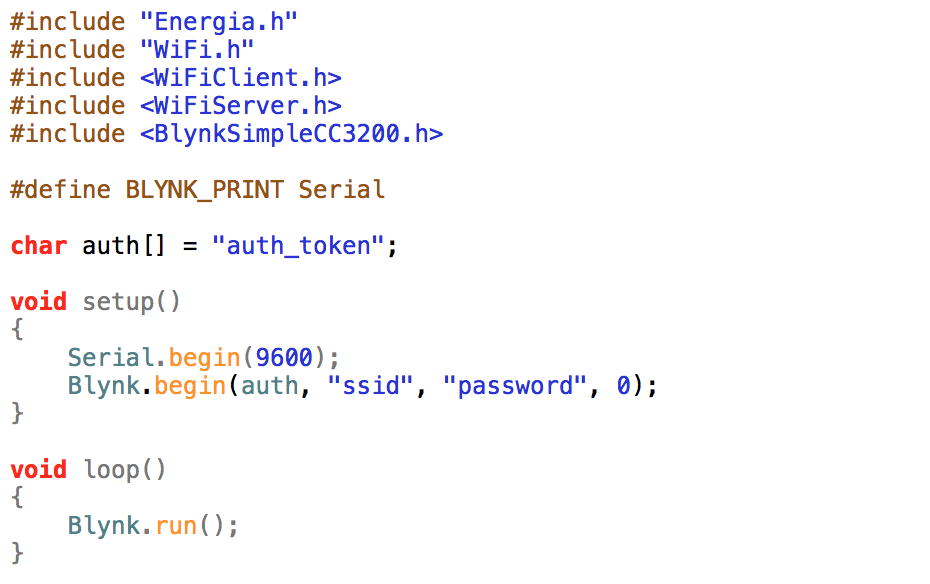
Picture
Picture

Write the Sketch

The sketch for the board is very compact with an initialisation and a run command.

The authentication token is provided by the app and sent by e-mail.

Picture
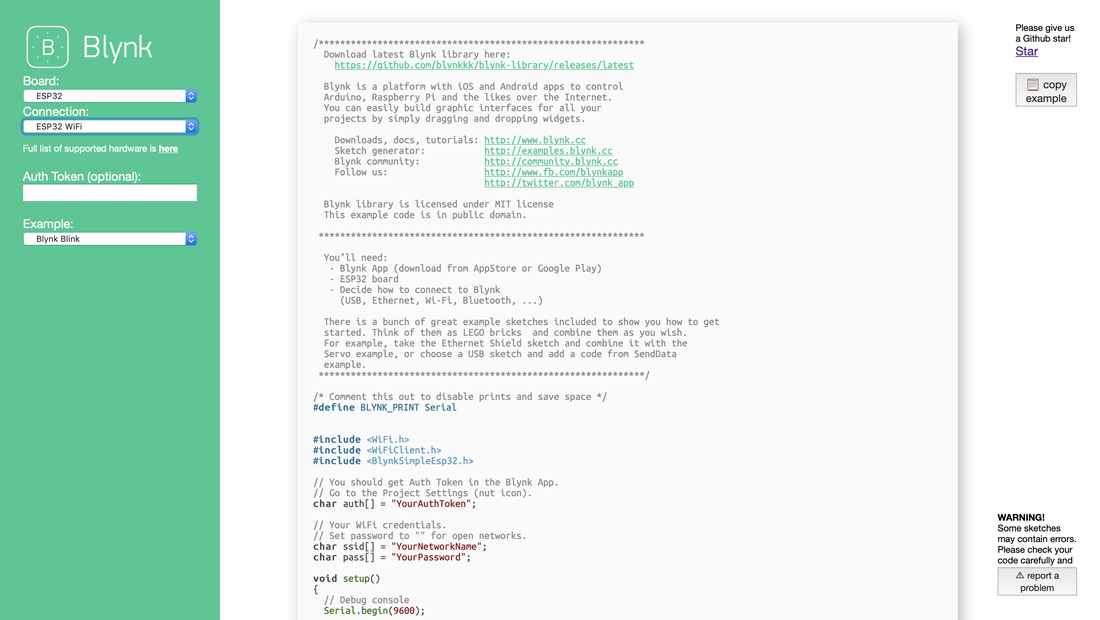
Blynk now provides an interactive example configurator. Select the board and the connection, enter the authentification token and then choose among a long list of examples. 

​The code is generated accordingly.
Picture

Play!

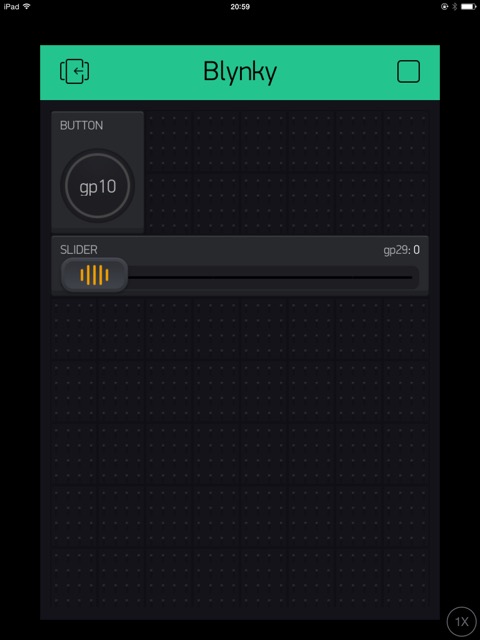
Once the the sketch has been uploaded, go back to the app and click on the arrow to launch the project.

The interface provides a feed-back. The button is illuminated when switched on, the slider displays an orange bar.

Speed and responsiveness are good, with a ping delay of 200 ms. 

Picture
Picture
Picture
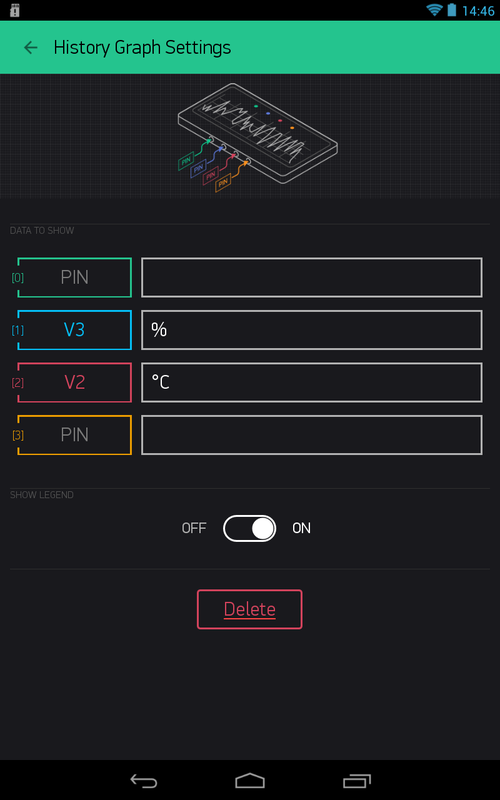
New release 0.3.0 of the Blynk library brings an History Graph, which can display up to 4 series. 

This is especially useful when used with a private server.

The way the LED widget is handled has changed. Posting
Blynk.virtualWrite(4, HIGH);
no longer works. Instead,
Blynk.virtualWrite(4, 1023);
is required to turn the LED on.
Picture
Picture

Using Blynk for IIoT Projects

I'm leveraging Blynk to command and control industrial models built with fischertechnik.

The 
​smartWiFi and ​smartBLE smartDevices use WiFi and BLE to connect to the Blynk app running on an Android or iOS smartphone or tablet, and allow to control the industrial models locally or remotely.
Picture

Conclusion

Blynk offers an elegant solution for adding an interface to a project. The iOS and Android applications are very polished and easy to use. 

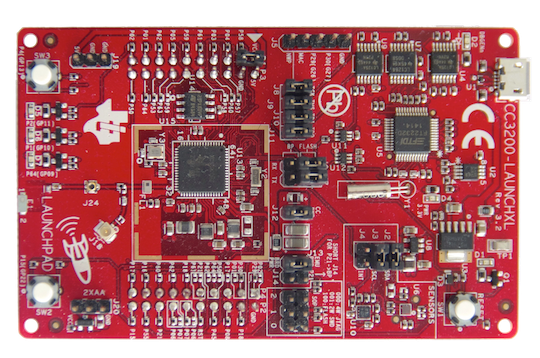
On top of a growing list of boards supported right out-of-the-box with ready-to-use drivers —mostly Arduino, but also Raspberry Pi, Particle Core and ESP8266—, Blynk provides clear instructions to develop a driver for a new board. This is what I've done for the LaunchPad CC3200 using embedXcode: Blynk included it on its mainstream distribution.

Up to now, Blynk focuses on displaying data and sending commands. I'd like Blynk to leverage the different sensors —keyboard, light, accelerometer, compass, microphone, camera— and actuators —sound— of my smartphone for a richer experience.
​
Picture
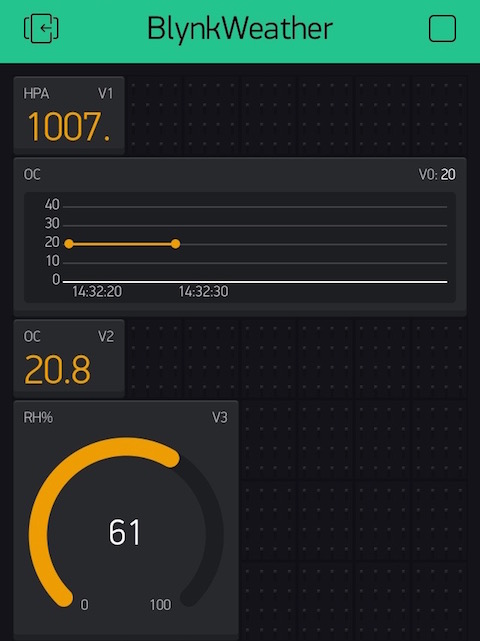
As a more elaborate example, a weather station, uses a BMP180 barometer and a DHT22 hydrometer and thermometer. 

Each measure is sent through a virtual pin with a refresh rate of 10 seconds.

Go though the detailed Weather and Security Station example. 

Blynk also runs on a local server. Check out the Private IoT with Blynk on Local Server.

New boards and widgets are being added at a regular pace. Development is very active.
​
Blynk has recently updated its offer with a pay-as-you-go scheme called Blynk Energy. Basically, creating a new project and using widgets consumes units, which are partially returned when the project is deleted and the widgets removed. Additional units can be purchased from the app.

I like the idea and hope this scheme will help and sustain the development of Blynk with new widgets, like sending a SMS. 
Picture

Pros

  • Professional looking interface for projects
  • Easy to use iOS and Android apps
  • New boards and widgets added

Cons

  • Commands and controls only, for the moment

Wrap-Up

  • Smart offer for IoT
  • Professional looking interface for projects
  • Easy to use iOS and Android apps
  • Active development 

Links

  • Blynk.cc website
  • Blynk forum
  • Blynk for LaunchPad CC3200
Picture
Posted: 25 Jul 2015
Updated: 31 Mar 2016, 10 Feb 2020
Powered by Create your own unique website with customizable templates.