Embedded Computing
  • About
  • Blog
  • Hardware
    • Which Platform?
    • Controller Platforms >
      • Adafruit Platform
      • Arduino Plaform
      • BBC micro:bit
      • Espressif Platform
      • iLabs Platform
      • Raspberry Pi Platform (MCU)
      • Seeed Platform
      • Silicon Labs Platform
      • Teensy Plaform
    • Computer Platforms >
      • BeagleBone Platform
      • Raspberry Pi Platform (SBC)
      • UDOO Platform
    • Peripherals >
      • Shields
      • Grove System
      • Sensors
      • Actuators
    • Displays >
      • E-Paper Displays
      • Reflective Displays
      • TFT Displays
      • LCD Displays
    • Legacy Platforms >
      • chipKIT Plaform
      • 4D Systems Platform
      • Intel Platform
      • LaunchPad Plaform
      • BoosterPacks for LaunchPads
      • LightBlue Bean
      • Maple Plaform
      • Mediatek Platform
      • Microsoft Azure IoT DevKit
      • Particle Platform
  • Software
    • Exploring RTOS with Galaxia >
      • Event Library
      • Semaphore Library
      • Mailbox Library
      • Timer Library
      • Clock Library
      • SWI Library
      • Task Library
    • Ultra-Low Power with EnergyTrace >
      • Ultra-Low Power with MSP430
      • Ultra-Low Power with Energia MT and Galaxia
    • Using Integers Instead of Reals
    • Going Python?
  • IoT
    • IoT Platforms: Which Hardware? >
      • Matter with Silicon Labs MG24
    • IoT Services: Which Solution? >
      • Recommended IoT Solutions
      • Platform-Specific IoT Solutions
      • Other IoT Solutions
      • Not tested IoT Solutions
      • Notification Solutions
    • Get Date and Time from Internet with NTP
    • Fast and Easy WiFi Connection with QR-Code
  • Tools
    • How to Start?
    • Reference >
      • Asking for Help
      • Boards Pins Maps
      • Ruler
      • Boards and Plugs
      • I²C Logic Level Converter
      • Standards for Connectors
    • Training >
      • Texas Instruments Workshops
      • Embedded Systems: Shape The World — MOOC edX UTAustinX UT.6.02x
      • Embedded Systems - Shape The World: Microcontroller Input/Output — MOOC edX UTAustinX UT.6.10x
      • Embedded Systems - Shape The World: Multi-Threaded Interfacing — MOOC edX UTAustinX UT.6.20x
      • Real-Time Bluetooth Networks: Shape the World — MOOC edX UTAustinX UT.RTBN.12.01x
      • Systems Thinking with Texas Instruments Robotics System Learning Kit
    • Books >
      • Getting Started with the MSP430 LaunchPad
      • Getting Started with Arduino
      • Arduino Cookbook
    • IDE >
      • The Battle of IDEs
      • More Options
      • Assessing the Next Generation of IDEs
      • Tools for Documentation
    • Equipment >
      • Saleae Logic Analyser
      • Rigol DS1102E Oscilloscope
      • XDS110 Debug Probe with EnergyTrace​
      • Segger J-Link Programmer-Debugger
      • Nordic Power Profiler Kit II
  • Projects
    • Libraries >
      • Master I²C Software Library
      • Date and Time Library
      • highView Library Suite
      • Others Libraries
    • smartDevices >
      • I²C smartColours Smart Sensor
      • I²C smartRFID Smart Sensor
      • I²C smartLED Display
      • I²C smartControls Smart Device
      • I²C smartWiFi Smart Device
      • I²C smartBLE Smart Device
      • I²C smartNode Smart Device
    • IoT Projects >
      • Remote E-Paper Weather and Message Board
      • Typie-Walkie with LoRa and E-Paper Screen
      • Typie-Walkie with E-Paper Screen
      • Remote e-Paper Pictures Panel
      • Remote e-Paper Messages Panel
      • Industrial IoT Project
      • Remote Contactless Temperature Monitor
      • Using Node-RED for IIoT
      • Low Power Home Network Weather Monitoring
      • Updated Low Power Home Network Weather Monitoring
      • Weather and Security Station with Blynk
      • SensorTag to Blynk Using Node-RED
      • Pervasive Reporting
    • AI Projects >
      • Colour Recognition with Neural Network
    • Other Projects >
      • Air Quality Monitoring
      • Driving a Large E-Paper Display with a Compact Xiao RP2040
      • Low-Power E-Paper Weather Station
      • Portable Particulate​ Matter Monitor
      • FRAM-based E-Paper Screen Controller
      • General Purpose 3.5" Screen
      • Colour Recognition with Neural Network
      • A Low Power Weather Station
      • Digital Volt-Amp-Watt Meter
      • Mobile Measurement with LCD Display
      • Screen with SRAM for GUI
      • Volt-Amp-Watt-Meter for Grove
      • Multi-Touch Project with CapTIvate

I²C smartControls Smart Device

This project is shared with the fischertechnik Corner website, as this device is intended for the fischertechnik Robo TX controller.

This part in more technical oriented.

Smart Device

How to call a device with its own embedded MCU? A smart device.

The MCU receives commands from the main controller and acts accordingly. It also manages local events, in this case the user interactions with the touch screen. 

This allows higher-level commands from the main controller and better response times.

smartControls

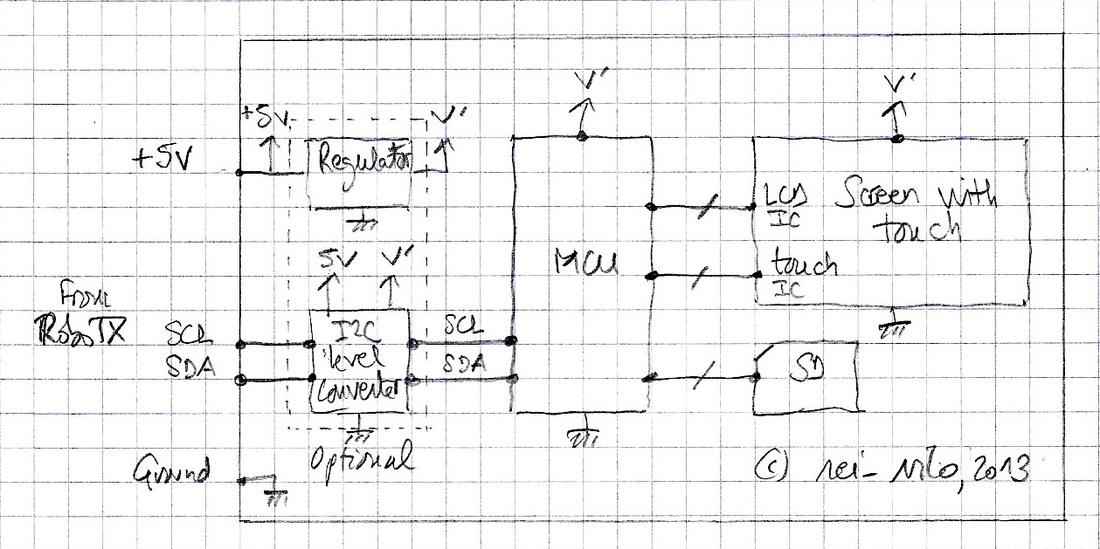
The device I'm working on is a touch screen with SD-card, called smartControls, to provide an interactive control panel to the fischertechnik models.

Based on the functional specifications, the main choices are about the screen and the MCU. 

The screen should provide at least QVGA or 320x240 definition or, better, a 400x240 definition to match with the fischertechnik box 10,5 x 6 cm form-factor. 

The MCU should provide an reliable I²C slave connection. The screen and touch controllers couldn't use the I²C bus, in order to prevent any collusion. The MCU should have as few pins as possible. 

Because I'm a hobbyist, I'd prefer to deal with DIP packages rather than SOIC or, even more difficult, SSOP. 

Finally, the whole firmware of the device is going to be developed in C++, with the Wiring-derived Arduino-like framework and the Xcode template embedXcode.
Picture

Selecting the Screen and MCU

After an extensive research, I came with two solutions. Each solutoin has two short-lists, one for screens and the other for MCUs.

The two solutions differ on how to manage the screen:
  • a basic screen requires a powerful MCU,
  • a smart screen allows a standard MCU.

Each solution has its pros and cons. Performance and total cost need to be arbitraged.
Picture

I²C Commands

Based on the functional specifications and after extensive tests with standard boards, I've defined three sets of commands: 
  • Build the interface, 
  • Run the interface,
  • Write and read files.

Learn more about the commands.

Building the Prototypes

For each solution, the prototypes were built in three steps.

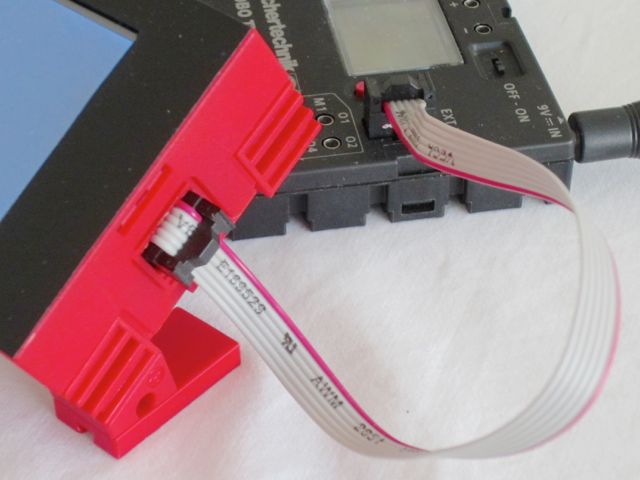
On the first step, I'm using two boards connected through I²C bus: 
  • One board acts as master and simulates the commands. 
  • Another board acts as slave and manages the screen, touch and SD-card. 

Response times and responsiveness are measured. Data traffic is monitored by a logic analyser.

Three boards were selected as slave: an Arduino Mega2560, a Wiring S and a LaunchPad Stellaris. Two boards were used as master: an Arduino Uno and a LaunchPad MSP430.

On the second step, pictured on the right, the board acting as master is replaced by the RoboTX controller. 

All the commands are defined with RoboPro so they can run on the RoboTX controller. A protocol of tests is defined and run against each of the two solutions.

Data traffic is monitored by a logic analyser and same emphasis is given to responsiveness, with an additional criteria for capability.

On the third and last prototype step, the board acting as slave is replaced by a circuit on the prototype board. 

The winning solution is then implemented on a circuit board and finally integrated into the fischertechnik 10,5 cm x 6 cm box!
Photo
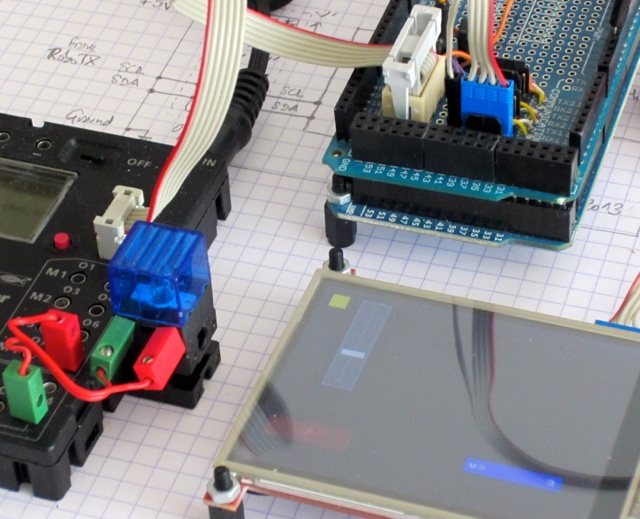
Second prototype step: RoboTX as master, standard board as slave

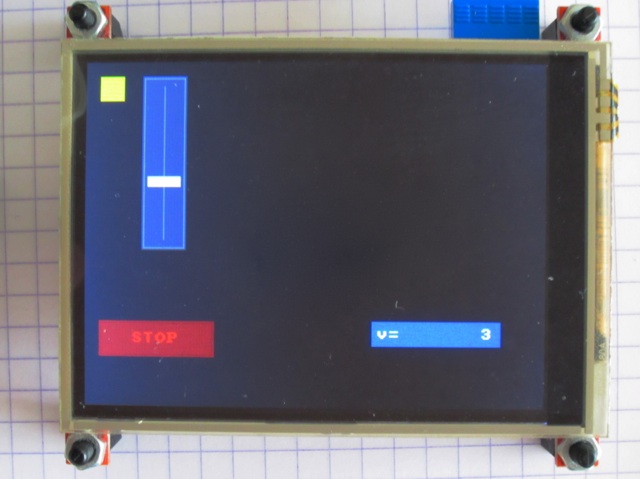
Finalised and Working Device

The final product is ready and working.

Discover it at the ft Convention 2013!
Photo
Powered by Create your own unique website with customizable templates.