Embedded Computing
  • About
  • Blog
  • Hardware
    • Which Platform?
    • Controller Platforms >
      • Adafruit Platform
      • Arduino Plaform
      • BBC micro:bit
      • Espressif Platform
      • LaunchPad Plaform
      • Microsoft Azure IoT DevKit
      • Seeeduino Platform
      • Teensy Plaform
    • Computer Platforms >
      • BeagleBone Platform
      • Mediatek Platform
      • UDOO Platform
    • Legacy Platforms >
      • chipKIT Plaform >
        • chipKIT Uno32 and uC32
        • chipKIT WF32 and WiFire
        • Compatibility
        • chipKIT PGM Programmer-Debugger
        • 4D Systems PICadillo-35T
        • Shields for chipKIT Uno32
        • 4D Systems Platform >
          • 4D Systems PICadillo-35T
          • 4D Systems gen4-IoD-28T
      • Cosa, an Alternative Framework for AVR Boards
      • DFRobot Platform >
        • DFRobot BLuno
        • DFRobot Wido
      • Digistump Platform >
        • Digispark
        • Oak
      • Intel Platform >
        • Intel Curie with Neural Network
        • Intel Edison
      • LightBlue Bean
      • Little Robot Friends
      • Maple Plaform >
        • LeafLabs Maple
      • Microduino Plaform >
        • Microduino
      • Particle Platform >
        • Particle Core
        • Particle Photon
        • Particle Tools
      • Protostack Platform >
        • Protostack Boards
      • RedBear Platform >
        • RedBearLab CC3200
        • RedBearLab WiFi Mini
        • RedBear Duo
      • Wiring Plaform >
        • Wiring S
        • Wiring Play Shield
    • Boards and Plugs
    • I²C Logic Level Converter
    • Peripherals >
      • BoosterPacks for LaunchPads
      • Shields
      • Grove System
      • Ten Years with the Grove System
      • Sensors
      • Actuators
    • Displays >
      • Pervasive Displays e-Paper Screens
      • FRAM-based E-Paper Screen Controller
      • The 2.8" HY28A LCD Screen
      • High-Definition 480x320 3.5" Screen With Touch and Fonts
      • Kentec 3.5" LCD SPI with Touch BoosterPack
      • 4D Systems Intelligent Screens
      • East Rising 5" LCD with RA8875, Touch, Fonts, Flash and SD-card
      • East Rising 5" LCD with SSD1963, Touch, Flash and SD-card
  • Software
    • The IDE Question >
      • The Battle of IDEs
      • More IDE Options
      • Looking for a Better IDE
      • Assessing the Next Generation of IDEs
    • Exploring RTOS with Galaxia >
      • Event Library
      • Semaphore Library
      • Mailbox Library
      • Timer Library
      • Clock Library
      • SWI Library
      • Task Library
    • Ultra-Low Power with EnergyTrace >
      • Ultra-Low Power with MSP430
      • Ultra-Low Power with Energia MT and Galaxia
    • Using Integers Instead of Reals
  • IoT
    • IoT Platforms: Which Hardware?
    • IoT Services: Which Solution? >
      • Recommended IoT Solutions
      • Platform-Specific IoT Solutions
      • Other IoT Solutions
      • Not tested IoT Solutions
      • Notification Solutions
    • Get Date and Time from Internet with NTP
    • Fast and Easy WiFi Connection with QR-Code
  • Tools
    • How to Start?
    • Reference >
      • Asking for Help
      • LaunchPad and BoosterPack Boards Pins Maps
      • Ruler
      • Standards for Connectors
    • Training >
      • Texas Instruments Workshops
      • Embedded Systems: Shape The World — MOOC edX UTAustinX UT.6.02x
      • Embedded Systems - Shape The World: Microcontroller Input/Output — MOOC edX UTAustinX UT.6.10x
      • Embedded Systems - Shape The World: Multi-Threaded Interfacing — MOOC edX UTAustinX UT.6.20x
      • Real-Time Bluetooth Networks: Shape the World — MOOC edX UTAustinX UT.RTBN.12.01x
      • Systems Thinking with Texas Instruments Robotics System Learning Kit
    • Books >
      • Getting Started with the MSP430 LaunchPad
      • Getting Started with Arduino
      • Arduino Cookbook
    • IDEs >
      • Texas Instruments Code Composer Studio 6
      • Texas Instruments Code Composer Studio Cloud
      • Energia
      • Tools for Documentation
    • Equipment >
      • Saleae Logic Analyser
      • Rigol DS1102E Oscilloscope
      • XDS110 Debug Probe with EnergyTrace​
      • Segger J-Link Programmer-Debugger
  • Projects
    • Libraries >
      • Master I²C Software Library
      • Date and Time Library
      • highView Library Suite
      • LCD_screen Library Suite
      • Others Libraries
    • smartDevices >
      • I²C smartColours Smart Sensor
      • I²C smartRFID Smart Sensor
      • I²C smartLED Display
      • I²C smartControls Smart Device
      • I²C smartWiFi Smart Device
      • I²C smartBLE Smart Device
      • I²C smartNode Smart Device
    • IoT Projects >
      • Remote e-Paper Messages Panel
      • Industrial IoT Project
      • Remote Contactless Temperature Monitor
      • Using Node-RED for IIoT
      • Low Power Home Network Weather Monitoring
      • Updated Low Power Home Network Weather Monitoring
      • Weather and Security Station with Blynk
      • SensorTag to Blynk Using Node-RED
      • Pervasive Reporting
    • AI Projects >
      • Colour Recognition with Neural Network
    • Other Projects >
      • Portable Particulate​ Matter Monitor
      • FRAM-based E-Paper Screen Controller
      • General Purpose 3.5" Screen
      • Colour Recognition with Neural Network
      • A Low Power Weather Station
      • Digital Volt-Amp-Watt Meter
      • Mobile Measurement with LCD Display
      • Screen with SRAM for GUI
      • Volt-Amp-Watt-Meter for Grove
      • Multi-Touch Project with CapTIvate

Using Node-RED for IIoT

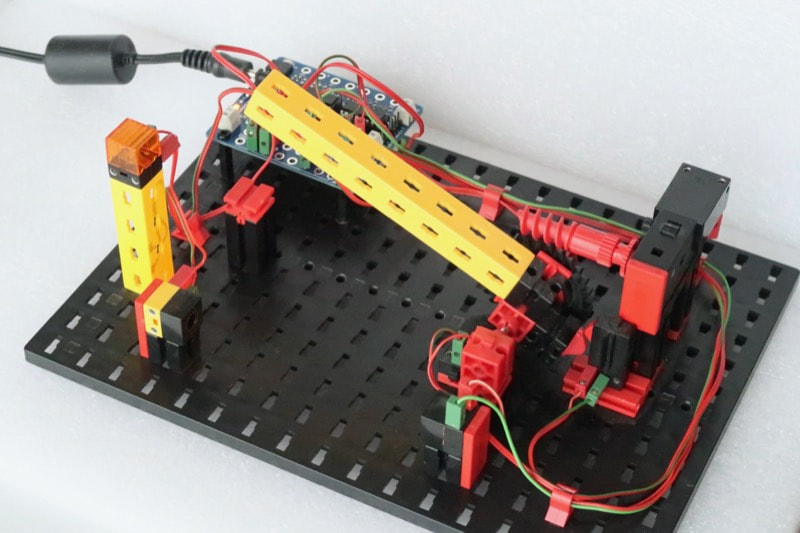
With the release of an interface board for Raspberry Pi to control the industrial models built with fischertechnik. The review of the board is available at Didacta Advance Pi-F5 interface board.

Sure, the Raspberry Pi runs on Linux and thus could not offer real-time deterministic monitoring or be considered as a PLC.

​However, Node-RED offers a nice graphic environment to develop the firmware that controls the industrial model.
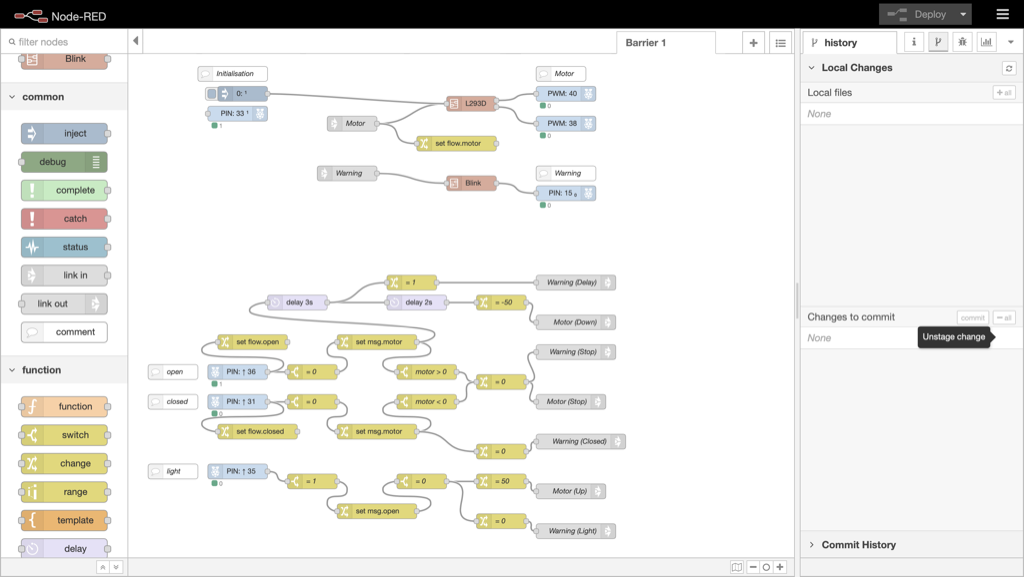
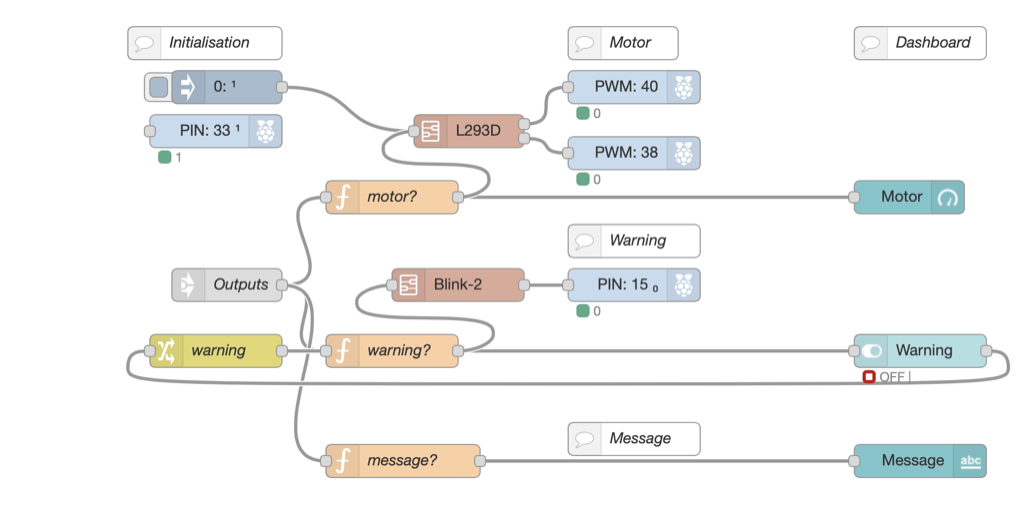
Picture

The initial flow

The initial flow wasn't very pretty nor easy to read, so I opted for implementing a solution based on finite-state machine. 

This method relies on an abstract model that lists a finite number of states —hence the name. Inputs can change the machine from one state to another: such changes are called transitions. A last element is the initial state the machine starts with.

I tried two nodes, node-red-contrib-finite-statemachine and node-red-contrib-fsm.

Picture

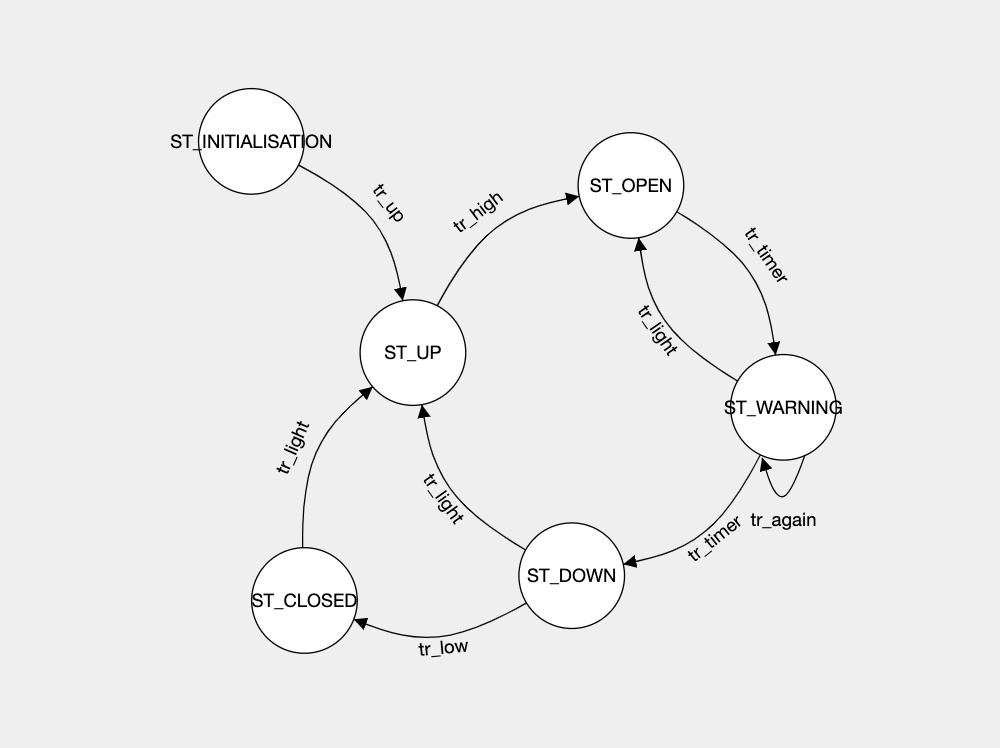
Finite-state machine to the rescue

The model includes 5 states, an initial state, and 9 transitions of 6 kinds.

So the first step was to identify the states and the transitions, and draw the graph accordingly.


​
Picture
​The node-red-contrib-finite-statemachine node requires to enter the states and transitions as a JSON sequence, but displays them with a nice graph.
​
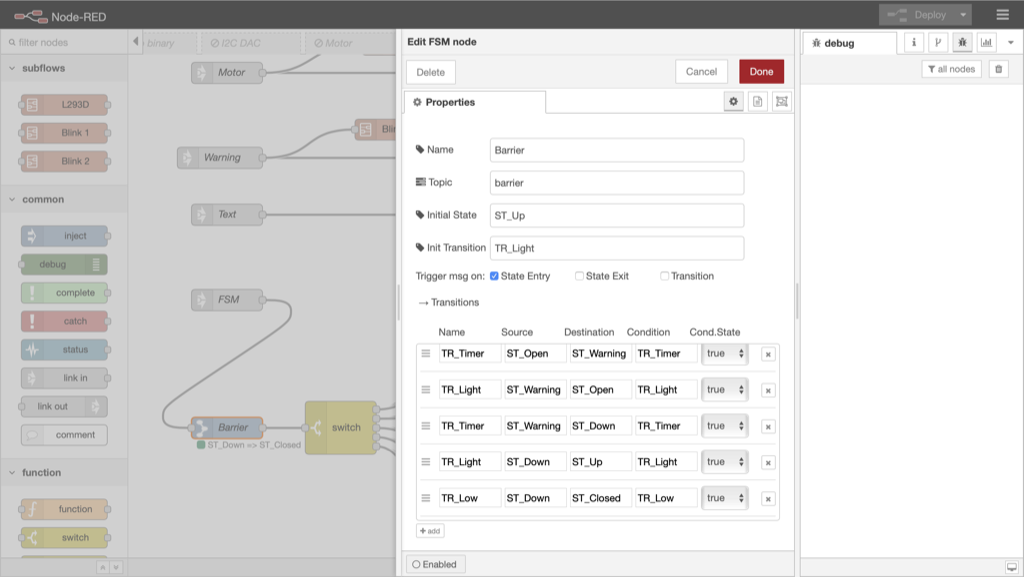
So I opted for the node-red-contrib-fsm node where states and transitions are defined in a table.
​
Picture
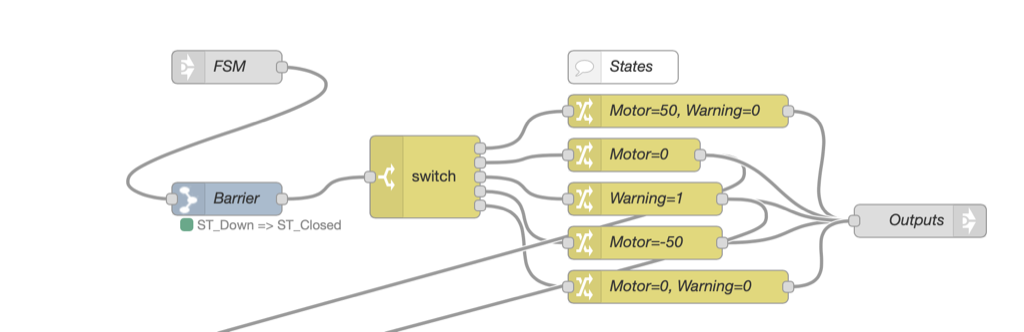
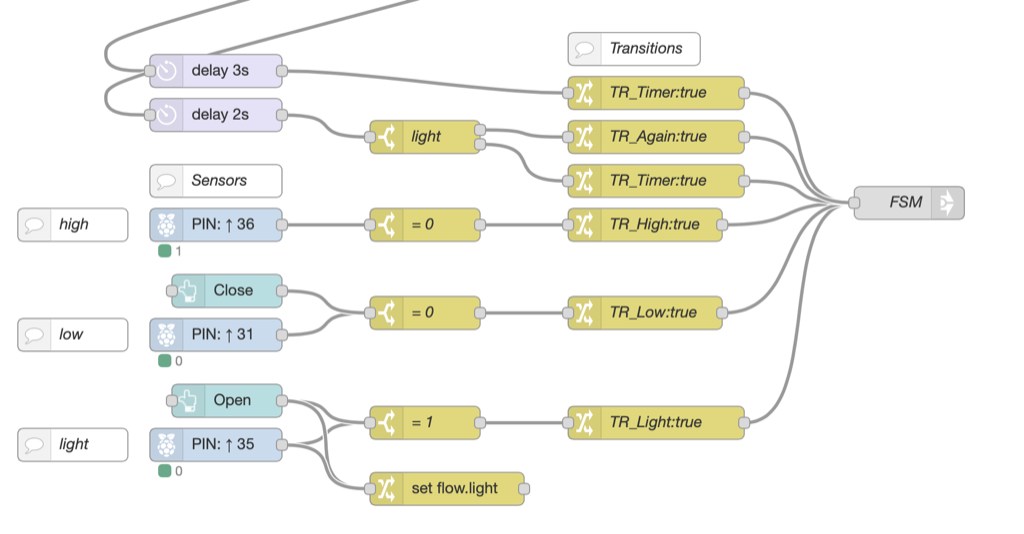
The flow consists on three parts:
  • ​The outputs ​part manages the motor, the blinking LED and the dashboard.
Picture
  • The FSM part defines the actions for each state.
Actions include setting the motor, turning the blinking LED on or off, and displaying a message.
Picture
  • The inputs ​part converts input into transitions for the FSM node.
Each event raised by a button, a phototransistor or a timer first goes through validation and then defines a transition sent to the FSM node.
Picture

Conclusion

Turning the initial flow into a finite-state machine was quick and easy. The major change is the split between the actions linked to a state and the inputs that trigger a transition.

This make the flow easier to read and maintain.

Links

  • Didacta Advance Pi-F5 interface board
  • ​Node node-red-contrib-finite-statemachine 
  • Node node-red-contrib-fsm

Posted: 06 Mar 2020
Updated: 10 Mar 2020
Powered by Create your own unique website with customizable templates.