Embedded Computing
  • About
  • Blog
  • Hardware
    • Which Platform?
    • Controller Platforms >
      • Adafruit Platform
      • Arduino Plaform
      • BBC micro:bit
      • Espressif Platform
      • LaunchPad Plaform
      • Microsoft Azure IoT DevKit
      • Seeeduino Platform
      • Teensy Plaform
    • Computer Platforms >
      • BeagleBone Platform
      • Mediatek Platform
      • UDOO Platform
    • Legacy Platforms >
      • chipKIT Plaform >
        • chipKIT Uno32 and uC32
        • chipKIT WF32 and WiFire
        • Compatibility
        • chipKIT PGM Programmer-Debugger
        • 4D Systems PICadillo-35T
        • Shields for chipKIT Uno32
        • 4D Systems Platform >
          • 4D Systems PICadillo-35T
          • 4D Systems gen4-IoD-28T
      • Cosa, an Alternative Framework for AVR Boards
      • DFRobot Platform >
        • DFRobot BLuno
        • DFRobot Wido
      • Digistump Platform >
        • Digispark
        • Oak
      • Intel Platform >
        • Intel Curie with Neural Network
        • Intel Edison
      • LightBlue Bean
      • Little Robot Friends
      • Maple Plaform >
        • LeafLabs Maple
      • Microduino Plaform >
        • Microduino
      • Particle Platform >
        • Particle Core
        • Particle Photon
        • Particle Tools
      • Protostack Platform >
        • Protostack Boards
      • RedBear Platform >
        • RedBearLab CC3200
        • RedBearLab WiFi Mini
        • RedBear Duo
      • Wiring Plaform >
        • Wiring S
        • Wiring Play Shield
    • Boards and Plugs
    • I²C Logic Level Converter
    • Peripherals >
      • BoosterPacks for LaunchPads
      • Shields
      • Grove System
      • Ten Years with the Grove System
      • Sensors
      • Actuators
    • Displays >
      • Pervasive Displays e-Paper Screens
      • FRAM-based E-Paper Screen Controller
      • The 2.8" HY28A LCD Screen
      • High-Definition 480x320 3.5" Screen With Touch and Fonts
      • Kentec 3.5" LCD SPI with Touch BoosterPack
      • 4D Systems Intelligent Screens
      • East Rising 5" LCD with RA8875, Touch, Fonts, Flash and SD-card
      • East Rising 5" LCD with SSD1963, Touch, Flash and SD-card
  • Software
    • The IDE Question >
      • The Battle of IDEs
      • More IDE Options
      • Looking for a Better IDE
      • Assessing the Next Generation of IDEs
    • Exploring RTOS with Galaxia >
      • Event Library
      • Semaphore Library
      • Mailbox Library
      • Timer Library
      • Clock Library
      • SWI Library
      • Task Library
    • Ultra-Low Power with EnergyTrace >
      • Ultra-Low Power with MSP430
      • Ultra-Low Power with Energia MT and Galaxia
    • Using Integers Instead of Reals
  • IoT
    • IoT Platforms: Which Hardware?
    • IoT Services: Which Solution? >
      • Recommended IoT Solutions
      • Platform-Specific IoT Solutions
      • Other IoT Solutions
      • Not tested IoT Solutions
      • Notification Solutions
    • Get Date and Time from Internet with NTP
    • Fast and Easy WiFi Connection with QR-Code
  • Tools
    • How to Start?
    • Reference >
      • Asking for Help
      • LaunchPad and BoosterPack Boards Pins Maps
      • Ruler
      • Standards for Connectors
    • Training >
      • Texas Instruments Workshops
      • Embedded Systems: Shape The World — MOOC edX UTAustinX UT.6.02x
      • Embedded Systems - Shape The World: Microcontroller Input/Output — MOOC edX UTAustinX UT.6.10x
      • Embedded Systems - Shape The World: Multi-Threaded Interfacing — MOOC edX UTAustinX UT.6.20x
      • Real-Time Bluetooth Networks: Shape the World — MOOC edX UTAustinX UT.RTBN.12.01x
      • Systems Thinking with Texas Instruments Robotics System Learning Kit
    • Books >
      • Getting Started with the MSP430 LaunchPad
      • Getting Started with Arduino
      • Arduino Cookbook
    • IDEs >
      • Texas Instruments Code Composer Studio 6
      • Texas Instruments Code Composer Studio Cloud
      • Energia
      • Tools for Documentation
    • Equipment >
      • Saleae Logic Analyser
      • Rigol DS1102E Oscilloscope
      • XDS110 Debug Probe with EnergyTrace​
      • Segger J-Link Programmer-Debugger
    • The 404 Collection
  • Projects
    • Libraries >
      • Master I²C Software Library
      • Date and Time Library
      • LCD_screen Library Suite
      • Others Libraries
    • smartDevices >
      • I²C smartColours Smart Sensor
      • I²C smartRFID Smart Sensor
      • I²C smartLED Display
      • I²C smartControls Smart Device
      • I²C smartWiFi Smart Device
      • I²C smartBLE Smart Device
      • I²C smartNode Smart Device
    • IoT Projects >
      • Industrial IoT Project
      • Remote Contactless Temperature Monitor
      • Using Node-RED for IIoT
      • Low Power Home Network Weather Monitoring
      • Updated Low Power Home Network Weather Monitoring
      • Weather and Security Station with Blynk
      • SensorTag to Blynk Using Node-RED
      • Pervasive Reporting
    • AI Projects >
      • Colour Recognition with Neural Network
    • Other Projects >
      • Portable Particulate​ Matter Monitor
      • FRAM-based E-Paper Screen Controller
      • General Purpose 3.5" Screen
      • Colour Recognition with Neural Network
      • A Low Power Weather Station
      • Digital Volt-Amp-Watt Meter
      • Mobile Measurement with LCD Display
      • Screen with SRAM for GUI
      • Volt-Amp-Watt-Meter for Grove
      • Multi-Touch Project with CapTIvate

IoT with Exosite

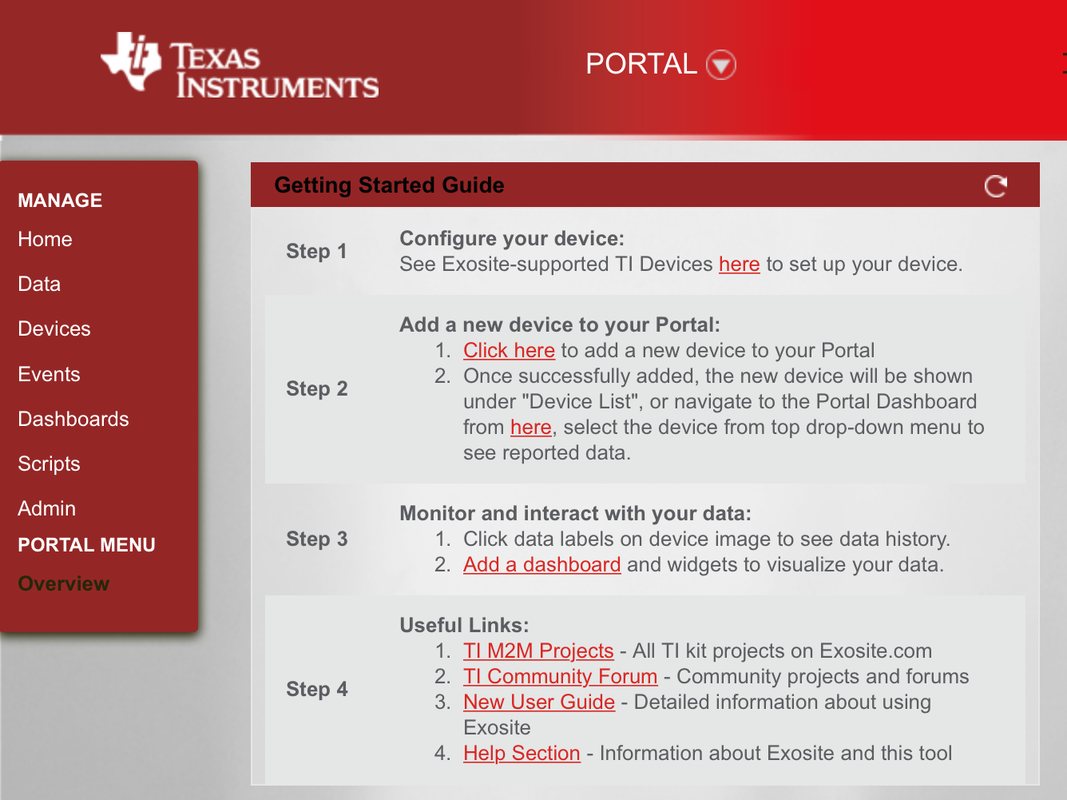
Texas Instruments provides an access to Exosite to test the IoT capabilities of the TM4C129 Connected LaunchPad and the CC3200 WiFi LaunchPad. Up to 2 devices can be created.

I've tested this service with a weather station on a CC3200 LaunchPad for one day. The weather station measures temperature, humidity, pressure and light, and sends data every 30 minutes. 
 
Picture

Create the Device

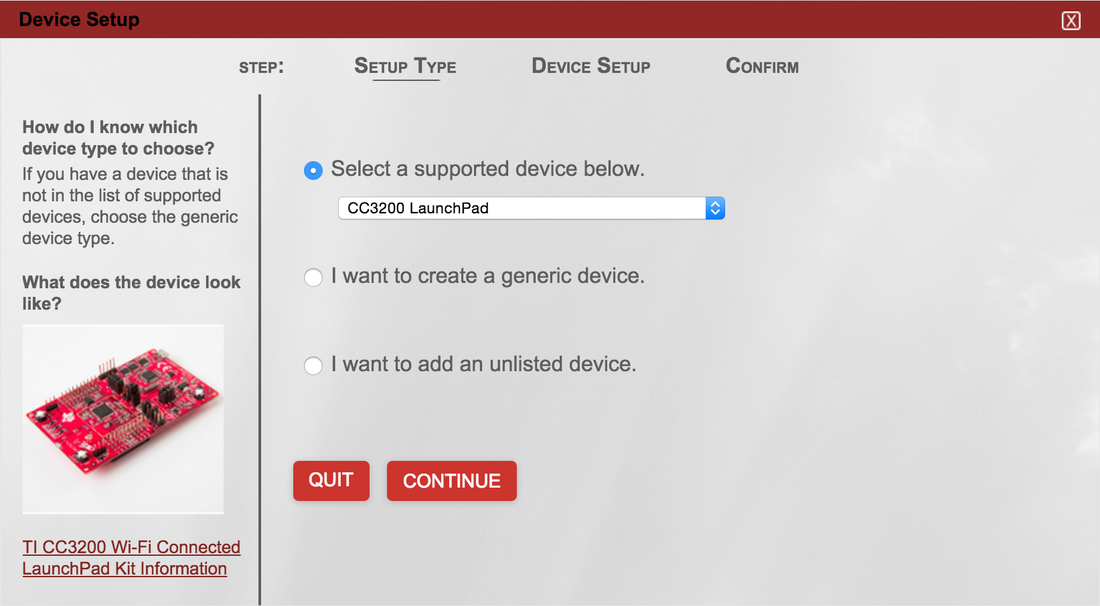
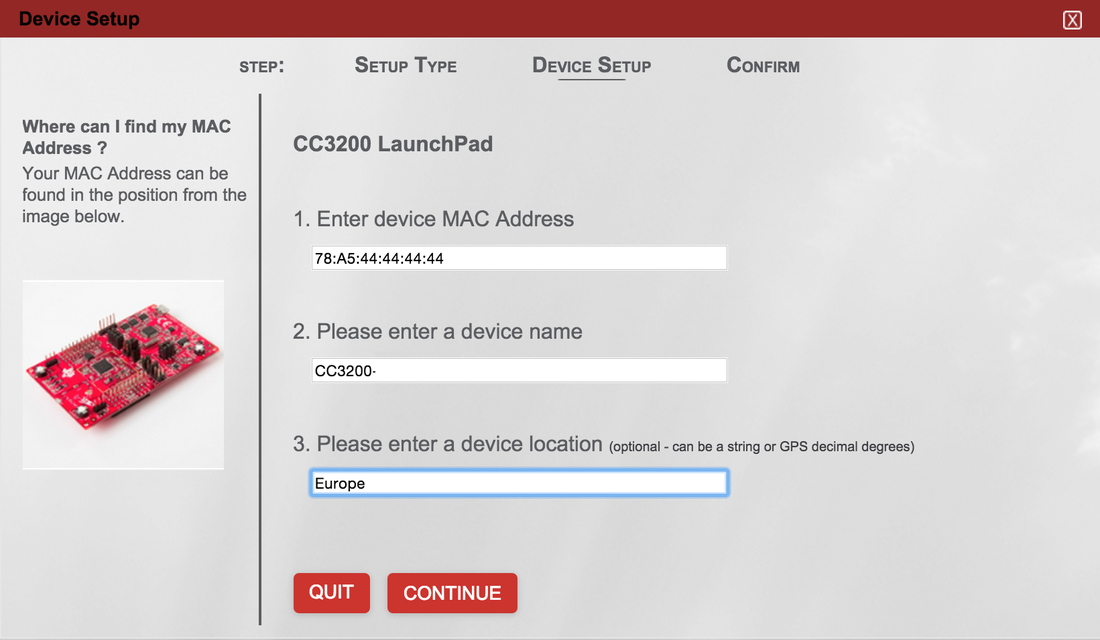
The first is about creating the device. Select it among a list of predefined devices or create your own. Enter the MAC address of the device: this element is key to identify the device and activate it. 

The confirmation screen provides a unique identifier, called CIK. Copy and keep it in a safe place.
Picture
Picture

Create the Data

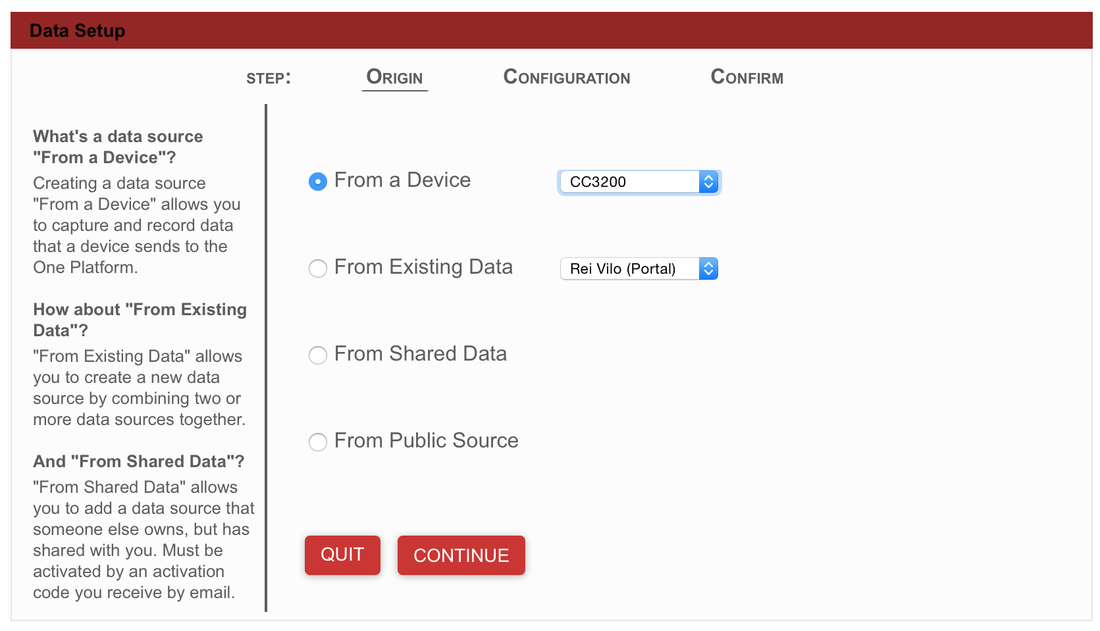
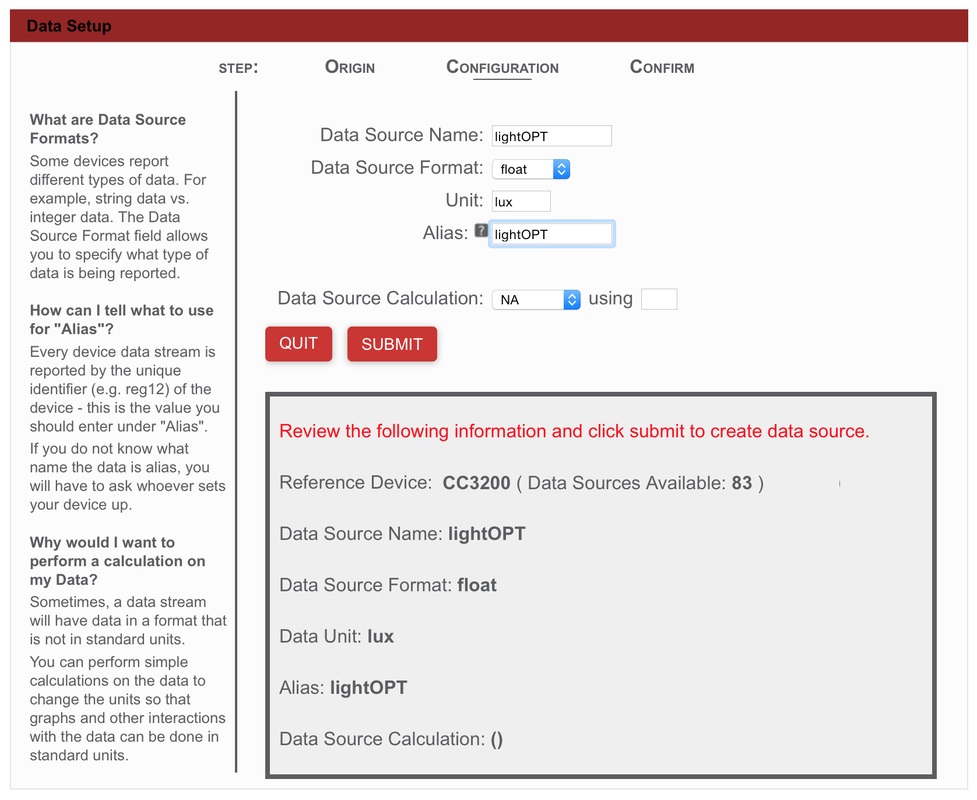
Once the device has been created, the second step is about which data you want to collect.

Select the source, here the device just create before. Then set the name, the format (integer, float, ...), the unit and an alias. The alias is useful for keeping the short names when sending data.
Picture
Picture

Create the Dashboard

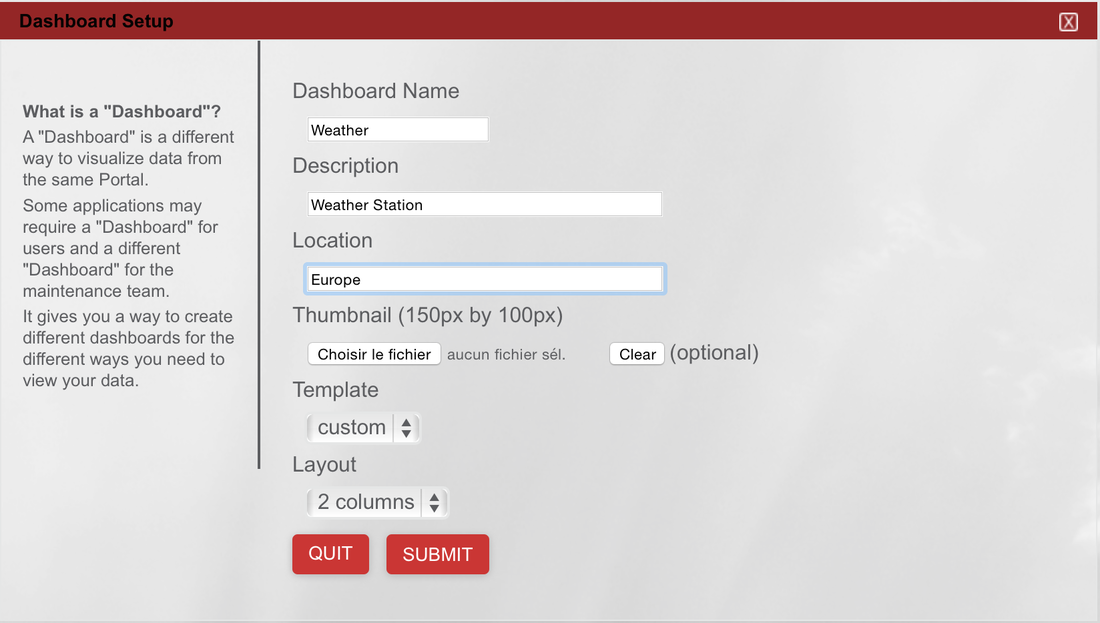
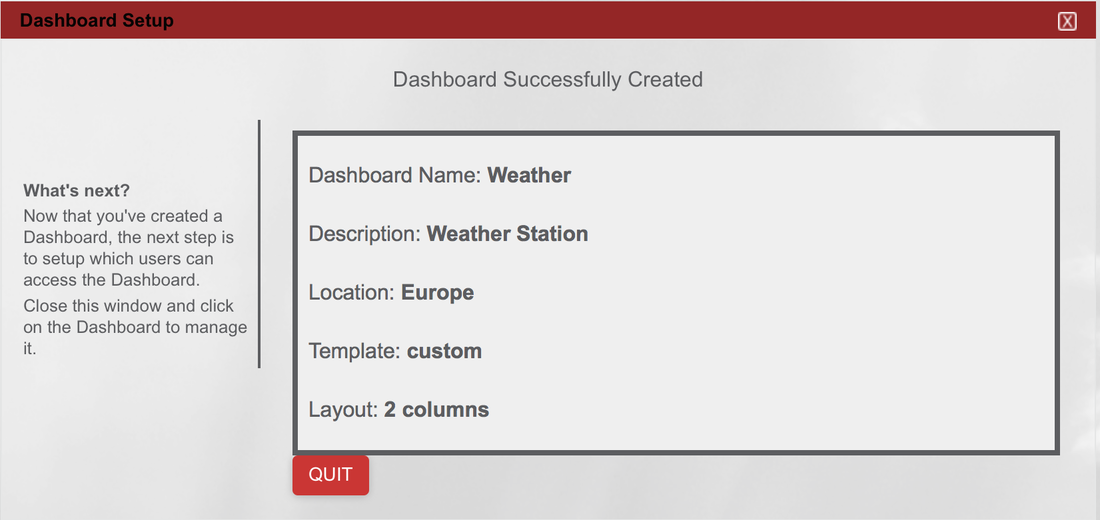
The third step is to create a dashboard to display the data. Click on +Add Dashboard. Name it and select the options.
Picture
Picture
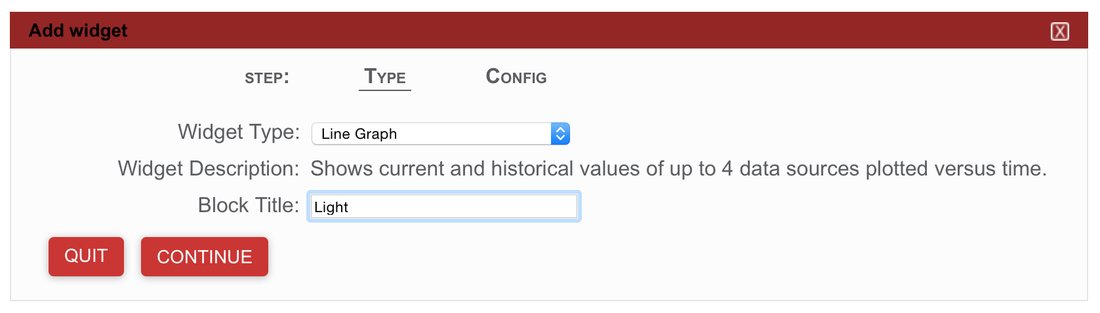
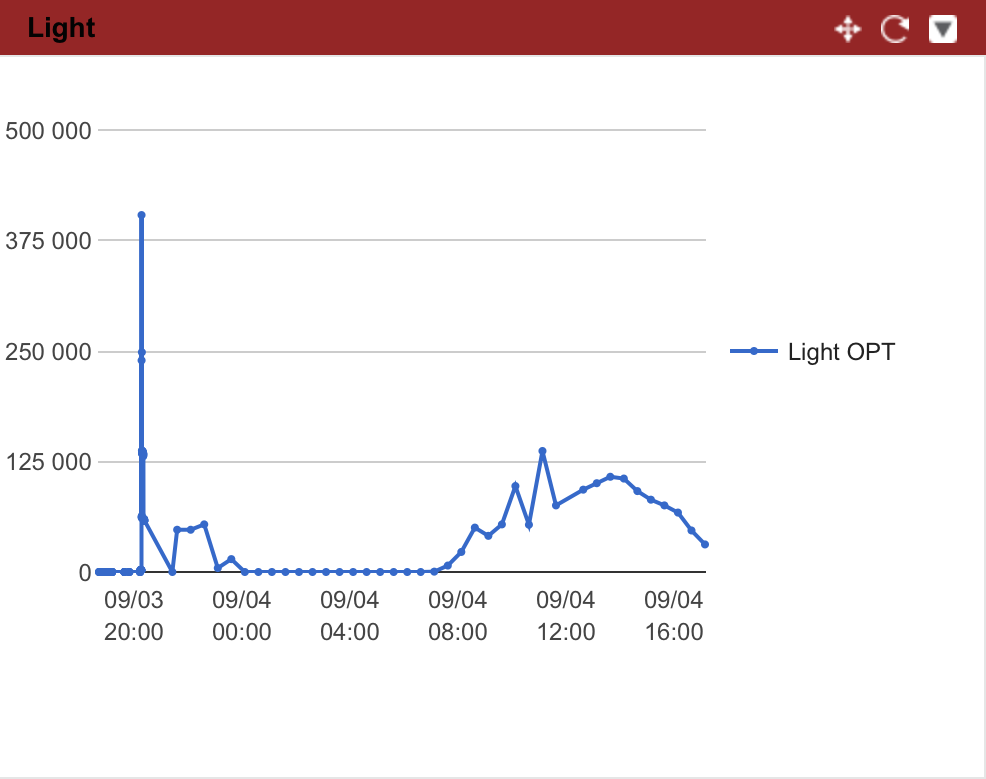
Select the newly created dashboard and click on the Add Widget button. Name it and select the source, here Light OPT.
Picture
Picture

Program the Board

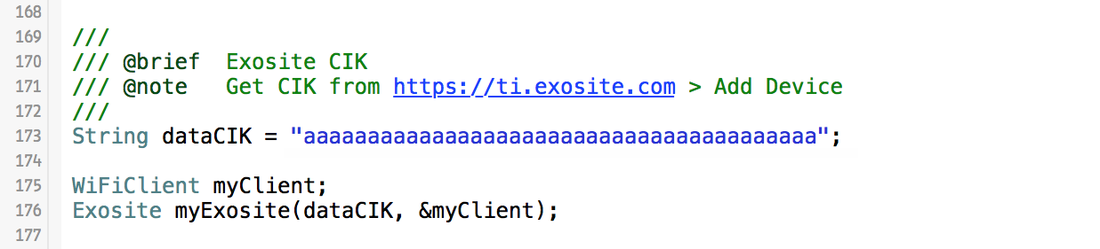
Remember the CIK obtained after creating the device? 

On the sketch running on Energia, paste it into the CIK variable. The program uses it to identify the device on the exist website. The client here is a WiFiClient on the CC3200 LaunchPad.
Picture
The first time it connects, the device needs to be activated or provisioned. This is done by the provision() method, with the vendor name, the model name and the MAC address used as identifier.

The writeRead() function sends and retrieves data to and from Exosite. Values are simples strings, here "light=31395.0". 
Picture

Run It!

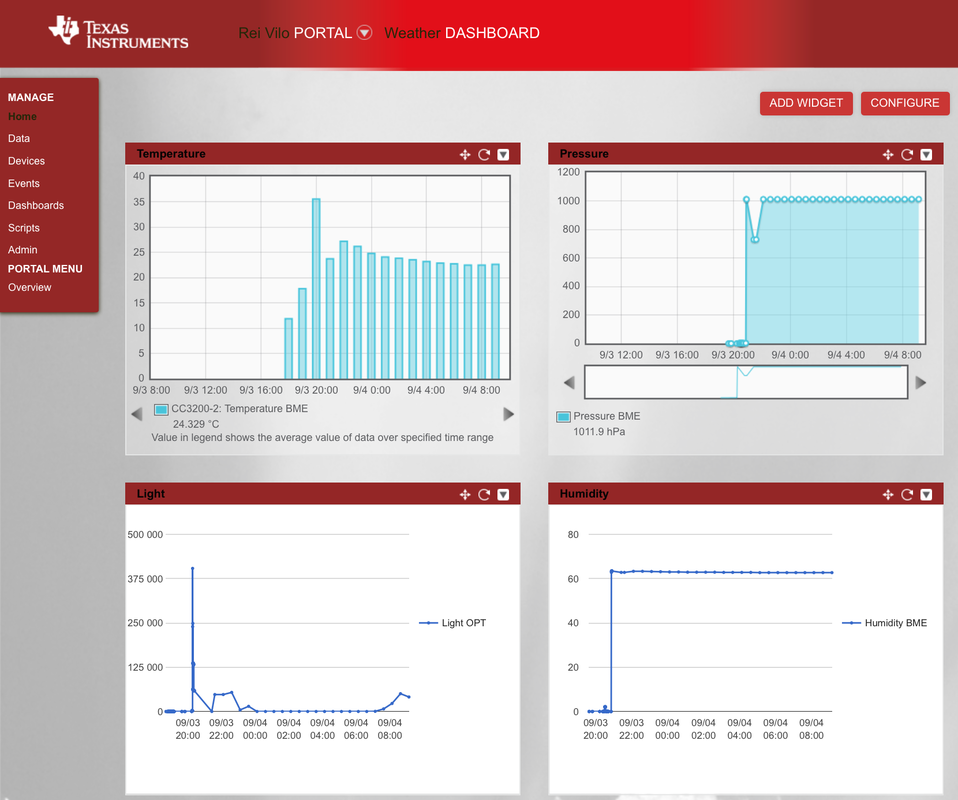
Once programmed, the application ran flawlessly during 24 hours. Only one report was missing. 

The dashboard displays nice graphics. 

On the data menu, each data can be listed and exported to a CSV file. However, I haven't found any way to edit the list and remove inconsistent data, like the peak at 20:00. 

The CSV of comma separated values file is a standard format read by all the spreadsheet. However, some spreadsheets don't read the dates correctly, formatted as a string, "20:05:35 Sep 3 2015 UTC".
Picture

Conclusion

There are many more options: creating an alert and sending an e-mail,   controlling the board remotely. Although the Exosite portal provides step-by-step procedures, configuration wasn't easy. 

The biggest challenge was the documentation. For example, I haven't managed to find the correct values for the parameters required for connection, as vendor and product names, on the support sections of the dedicated Exosite for TI and Exosite websites. Another example, I faced confusing wording for key operations: are device activation and device provisioning the same operation? 

The Exosite Garage GitHub repository provides libraries for Arduino and Particle as well as examples for CC3200. 

Exosite needs some polishing before bringing IoT to everyone.


Click to enlarge
Picture

Pros

  • Some popular platforms are supported for an out-of-the-box experience 
  • Step-by-step procedures

Cons

  • Confusing documentation

Wrap-Up

  • Tool for professionals


Links

  • Exosite
  • Exosite Garage libraries for Arduino, Particle
  • Exosite Documentation, API Reference and Tutorials 
  • Demo for CC3200 LaunchPad 


Picture
Powered by Create your own unique website with customizable templates.