Embedded Computing
  • About
  • Blog
  • Hardware
    • Which Platform?
    • Controller Platforms >
      • Adafruit Platform
      • Arduino Plaform
      • BBC micro:bit
      • Espressif Platform
      • LaunchPad Plaform
      • Raspberry Pi Platform (MCU)
      • Seeeduino Platform
      • Teensy Plaform
    • Computer Platforms >
      • BeagleBone Platform
      • Raspberry Pi Platform (SBC)
      • UDOO Platform
    • Peripherals >
      • BoosterPacks for LaunchPads
      • Shields
      • Grove System
      • Sensors
      • Actuators
    • Displays >
      • E-Paper Displays
      • Reflective Displays
      • TFT Displays
      • LCD Displays
    • Legacy Platforms
  • Software
    • Exploring RTOS with Galaxia >
      • Event Library
      • Semaphore Library
      • Mailbox Library
      • Timer Library
      • Clock Library
      • SWI Library
      • Task Library
    • Ultra-Low Power with EnergyTrace >
      • Ultra-Low Power with MSP430
      • Ultra-Low Power with Energia MT and Galaxia
    • Using Integers Instead of Reals
  • IoT
    • IoT Platforms: Which Hardware?
    • IoT Services: Which Solution? >
      • Recommended IoT Solutions
      • Platform-Specific IoT Solutions
      • Other IoT Solutions
      • Not tested IoT Solutions
      • Notification Solutions
    • Get Date and Time from Internet with NTP
    • Fast and Easy WiFi Connection with QR-Code
  • Tools
    • How to Start?
    • Reference >
      • Asking for Help
      • Boards Pins Maps
      • Ruler
      • Boards and Plugs
      • I²C Logic Level Converter
      • Standards for Connectors
    • Training >
      • Texas Instruments Workshops
      • Embedded Systems: Shape The World — MOOC edX UTAustinX UT.6.02x
      • Embedded Systems - Shape The World: Microcontroller Input/Output — MOOC edX UTAustinX UT.6.10x
      • Embedded Systems - Shape The World: Multi-Threaded Interfacing — MOOC edX UTAustinX UT.6.20x
      • Real-Time Bluetooth Networks: Shape the World — MOOC edX UTAustinX UT.RTBN.12.01x
      • Systems Thinking with Texas Instruments Robotics System Learning Kit
    • Books >
      • Getting Started with the MSP430 LaunchPad
      • Getting Started with Arduino
      • Arduino Cookbook
    • IDE >
      • The Battle of IDEs >
        • Arduino IDE 2.0
      • More Options
      • Assessing the Next Generation of IDEs
      • Tools for Documentation
    • Equipment >
      • Saleae Logic Analyser
      • Rigol DS1102E Oscilloscope
      • XDS110 Debug Probe with EnergyTrace​
      • Segger J-Link Programmer-Debugger
      • Nordic Power Profiler Kit II
  • Projects
    • Libraries >
      • Master I²C Software Library
      • Date and Time Library
      • highView Library Suite
      • Others Libraries
    • smartDevices >
      • I²C smartColours Smart Sensor
      • I²C smartRFID Smart Sensor
      • I²C smartLED Display
      • I²C smartControls Smart Device
      • I²C smartWiFi Smart Device
      • I²C smartBLE Smart Device
      • I²C smartNode Smart Device
    • IoT Projects >
      • Remote e-Paper Pictures Panel
      • Remote e-Paper Messages Panel
      • Industrial IoT Project
      • Remote Contactless Temperature Monitor
      • Using Node-RED for IIoT
      • Low Power Home Network Weather Monitoring
      • Updated Low Power Home Network Weather Monitoring
      • Weather and Security Station with Blynk
      • SensorTag to Blynk Using Node-RED
      • Pervasive Reporting
    • AI Projects >
      • Colour Recognition with Neural Network
    • Other Projects >
      • Driving a Large E-Paper Display with a Compact Xiao RP2040
      • Low-Power E-Paper Weather Station
      • Portable Particulate​ Matter Monitor
      • FRAM-based E-Paper Screen Controller
      • General Purpose 3.5" Screen
      • Colour Recognition with Neural Network
      • A Low Power Weather Station
      • Digital Volt-Amp-Watt Meter
      • Mobile Measurement with LCD Display
      • Screen with SRAM for GUI
      • Volt-Amp-Watt-Meter for Grove
      • Multi-Touch Project with CapTIvate

Little Robot Friends

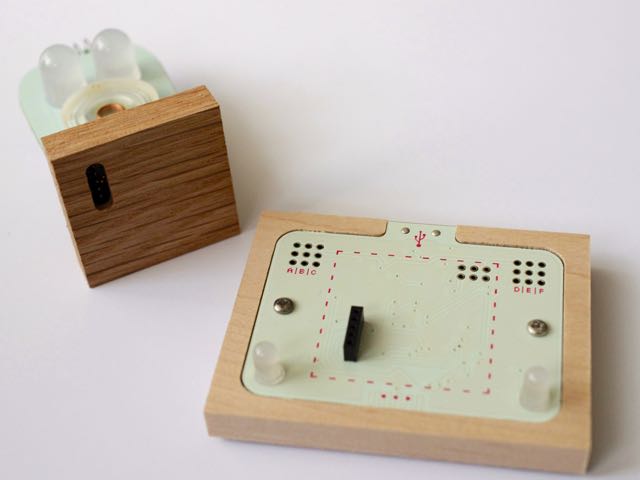
The Little Robot Friends board is a nice robot featuring a large array of sensors and actuators. It runs on an ATmega328P and can be programmed using a dock. 

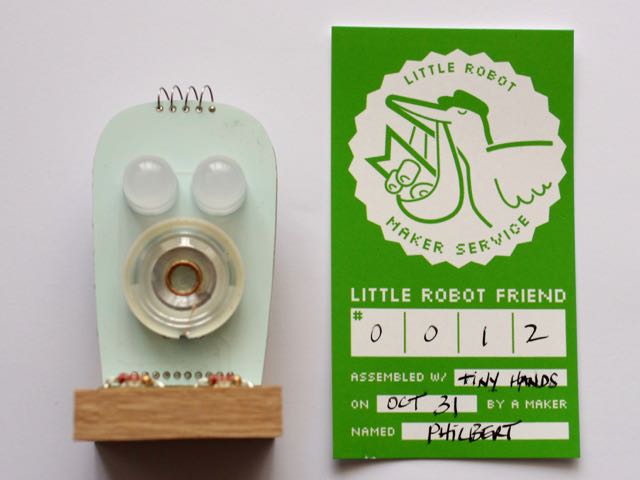
The board comes either ready-to-use or as a DIY kit. I had the opportunity to build my own robot. 

Picture

Out-of-the-Box Experience

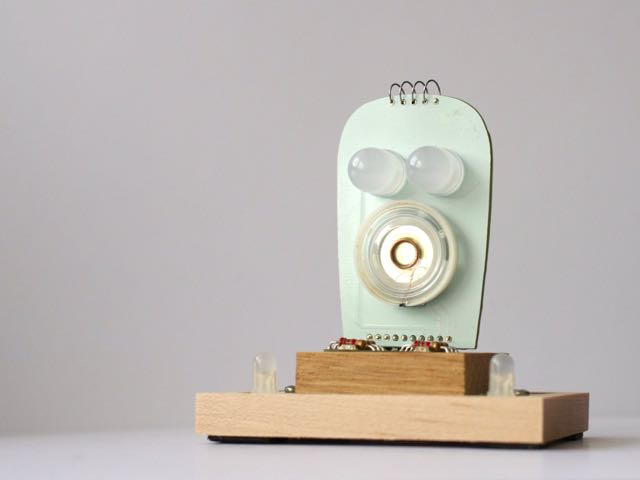
The robot needs 2 AAA batteries. Once powered, it blinks and buzzes right out of the box! 

It reacts to touch, sounds and light. It makes sound and blinks the two large RGB LEDs.

Different videos show how to interact with the robot.

An optional dock is required for programming.

Also, robots can talk one with another through infra-red. Each robot has an emitter and a receiver.

Picture

Making my Own Robot

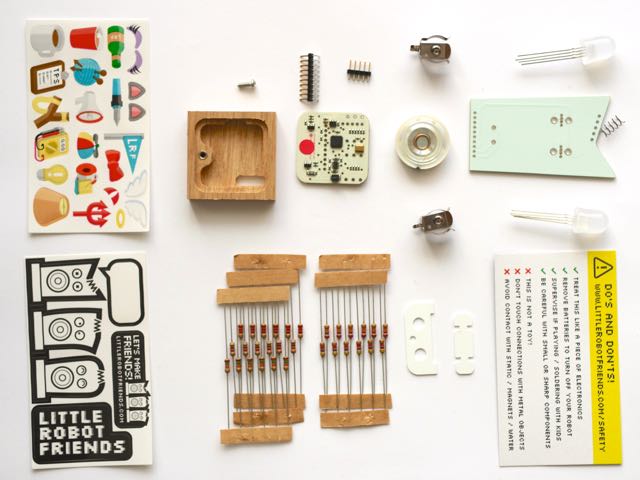
I had a lot of fun building my own robot. Actually, the boards come populated with the SMD components. To complete the robot, one has to solder the 2 RGB LEDs, the buzzer, the touch sensor, the connectors and the resistors. 

The resistors define the personality of the robot around 6 traits: Happiness, Chattiness, Humour, Enthusiasm, Neediness, Bravery. Each trait is defined by the value of the resistor to choose among the provided 2.2, 4.7, 9.1, 15 or 27 kΩ.

A video explains each step in details. Another video explains how to customise the personality of the Robot.However, I'd have appreciated a map for the location of the resistors and a list of the values to choose and define the personality more easily.

The only difficult part for the DIY-kit is dealing with the pitch. Pins are very close —about 2mm— and traces are very small. Even using a soldering iron with a precision tip and magnifying glasses, soldering some of the components require a good practice.

Picture

Software

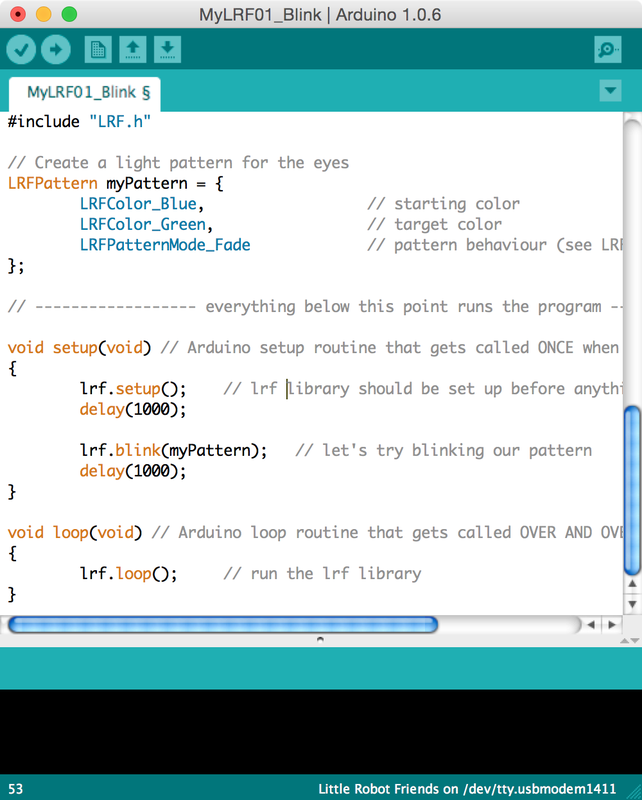
Installation of the software on a Mac implies three steps:
  • Download and install the Arduino 1.0 IDE under the /Applications folder. Release 1.5 doesn't work.
  • Download the Little Robot Friends library and install it. 

Installation was very was easy and worked on the first try.


The IDE is the standard Arduino IDE version 1.0. Version 1.5 is not supported.

All the peripherals are managed through the lrf object. 
LRFPattern myPattern = {
    LRFColor_Blue,
    LRFColor_Red, 
    LRFPatternMode_Fade
};

void myHandler(void) {
    lrf.blink(myPattern);
}

void setup() {
    lrf.setup();
    lrf.setEventHandler(LRFEvent_Tap, &myHandler);
}

void loop() {
    lrf.loop();
}
lrf.setEventHandler defines the event, here a tap. When raised, it calls the function myHandler.

Once the sketch is ready, press Verify or Upload. The IDE compiles the sketch and then launches the uploader. The docks blinks the LEDs during the upload.

Picture
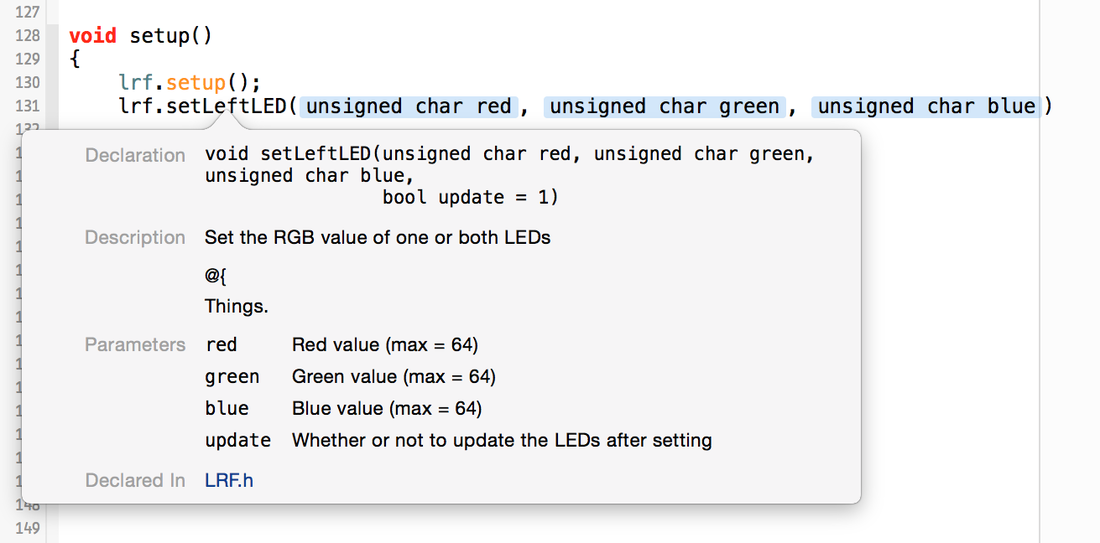
The library is very clean and includes full documentation right inside the code. 

The Quick Help feature of Xcode displays the list of available functions and required parameters, and provides help on demand.
Picture

Conclusion

The Little Robot Friends is a great tool to discover embedded computing. The large array of sensors and actuators make it very versatile.

The provided library allows a more advanced customisation of the robot. The documentation is well written and the examples give a solid start for programming more complex interactions.

The only difficult part for the DIY-kit is dealing with the pitch. Pins are very close —about 2mm— and traces are very small.

I really appreciate the fact the kit can address different ages: kids playing with then robot as well as teens programming customised interactions.
Picture

Pros

  • Nice robot
  • True plug-and-play 
  • Great tutorials
  • Standard IDE

Cons

  • Rather difficult DIY kit

Wrap-Up

  • Great introduction to embedded computing
  • Many tutorials, examples and videos available

Links

  • Little Robot Friends page
  • Software installation and reference
  • Guides and FAQ
  • Tutorials
Picture
Powered by Create your own unique website with customizable templates.