Embedded Computing
  • About
  • Blog
  • Hardware
    • Which Platform?
    • Controller Platforms >
      • Adafruit Platform
      • Arduino Plaform
      • BBC micro:bit
      • Espressif Platform >
        • ESP32-DevKitM-2 Board
      • LaunchPad Plaform
      • Microsoft Azure IoT DevKit
      • Raspberry Pi Platform
      • Seeeduino Platform
      • Teensy Plaform
    • Computer Platforms >
      • BeagleBone Platform
      • Mediatek Platform
      • UDOO Platform
    • Peripherals >
      • BoosterPacks for LaunchPads
      • Shields
      • Grove System
      • Sensors
      • Actuators
    • Displays >
      • E-Paper Displays
      • Reflective Displays
      • TFT Displays
      • LCD Displays
    • Legacy Platforms >
      • chipKIT Plaform >
        • chipKIT Uno32 and uC32
        • chipKIT WF32 and WiFire
        • Compatibility
        • chipKIT PGM Programmer-Debugger
        • 4D Systems PICadillo-35T
        • Shields for chipKIT Uno32
        • 4D Systems Platform >
          • 4D Systems PICadillo-35T
          • 4D Systems gen4-IoD-28T
      • Cosa, an Alternative Framework for AVR Boards
      • DFRobot Platform >
        • DFRobot BLuno
        • DFRobot Wido
      • Digistump Platform >
        • Digispark
        • Oak
      • Intel Platform >
        • Intel Curie with Neural Network
        • Intel Edison
      • LightBlue Bean
      • Little Robot Friends
      • Maple Plaform >
        • LeafLabs Maple
      • Microduino Plaform >
        • Microduino
      • Particle Platform >
        • Particle Core
        • Particle Photon
        • Particle Tools
      • Protostack Platform >
        • Protostack Boards
      • RedBear Platform >
        • RedBearLab CC3200
        • RedBearLab WiFi Mini
        • RedBear Duo
      • Wiring Plaform >
        • Wiring S
        • Wiring Play Shield
  • Software
    • Exploring RTOS with Galaxia >
      • Event Library
      • Semaphore Library
      • Mailbox Library
      • Timer Library
      • Clock Library
      • SWI Library
      • Task Library
    • Ultra-Low Power with EnergyTrace >
      • Ultra-Low Power with MSP430
      • Ultra-Low Power with Energia MT and Galaxia
    • Using Integers Instead of Reals
  • IoT
    • IoT Platforms: Which Hardware?
    • IoT Services: Which Solution? >
      • Recommended IoT Solutions
      • Platform-Specific IoT Solutions
      • Other IoT Solutions
      • Not tested IoT Solutions
      • Notification Solutions
    • Get Date and Time from Internet with NTP
    • Fast and Easy WiFi Connection with QR-Code
  • Tools
    • How to Start?
    • Reference >
      • Asking for Help
      • Boards Pins Maps
      • Ruler
      • Boards and Plugs
      • I²C Logic Level Converter
      • Standards for Connectors
    • Training >
      • Texas Instruments Workshops
      • Embedded Systems: Shape The World — MOOC edX UTAustinX UT.6.02x
      • Embedded Systems - Shape The World: Microcontroller Input/Output — MOOC edX UTAustinX UT.6.10x
      • Embedded Systems - Shape The World: Multi-Threaded Interfacing — MOOC edX UTAustinX UT.6.20x
      • Real-Time Bluetooth Networks: Shape the World — MOOC edX UTAustinX UT.RTBN.12.01x
      • Systems Thinking with Texas Instruments Robotics System Learning Kit
    • Books >
      • Getting Started with the MSP430 LaunchPad
      • Getting Started with Arduino
      • Arduino Cookbook
    • IDE >
      • The Battle of IDEs >
        • Arduino IDE 2.0
      • More Options
      • Assessing the Next Generation of IDEs
      • Tools for Documentation
    • Equipment >
      • Saleae Logic Analyser
      • Rigol DS1102E Oscilloscope
      • XDS110 Debug Probe with EnergyTrace​
      • Segger J-Link Programmer-Debugger
      • Nordic Power Profiler Kit II
  • Projects
    • Libraries >
      • Master I²C Software Library
      • Date and Time Library
      • highView Library Suite
      • Others Libraries
    • smartDevices >
      • I²C smartColours Smart Sensor
      • I²C smartRFID Smart Sensor
      • I²C smartLED Display
      • I²C smartControls Smart Device
      • I²C smartWiFi Smart Device
      • I²C smartBLE Smart Device
      • I²C smartNode Smart Device
    • IoT Projects >
      • Remote e-Paper Pictures Panel
      • Remote e-Paper Messages Panel
      • Industrial IoT Project
      • Remote Contactless Temperature Monitor
      • Using Node-RED for IIoT
      • Low Power Home Network Weather Monitoring
      • Updated Low Power Home Network Weather Monitoring
      • Weather and Security Station with Blynk
      • SensorTag to Blynk Using Node-RED
      • Pervasive Reporting
    • AI Projects >
      • Colour Recognition with Neural Network
    • Other Projects >
      • Driving a Large E-Paper Display with a Compact Xiao RP2040
      • Low-Power E-Paper Weather Station
      • Portable Particulate​ Matter Monitor
      • FRAM-based E-Paper Screen Controller
      • General Purpose 3.5" Screen
      • Colour Recognition with Neural Network
      • A Low Power Weather Station
      • Digital Volt-Amp-Watt Meter
      • Mobile Measurement with LCD Display
      • Screen with SRAM for GUI
      • Volt-Amp-Watt-Meter for Grove
      • Multi-Touch Project with CapTIvate

IoT with LinkIt One

MediaTek offers a cloud service named MediaTek Cloud Sandbox for its LinkIt One, the all-in-one IoT board with WiFi, BLE, GMS/GPRS and GPS.

​I've followed and adapted the Weather Station Tutorial provided by MediaTek and used a WiFi connection.
Picture

Build the Dashboard  

  • Create a prototype.

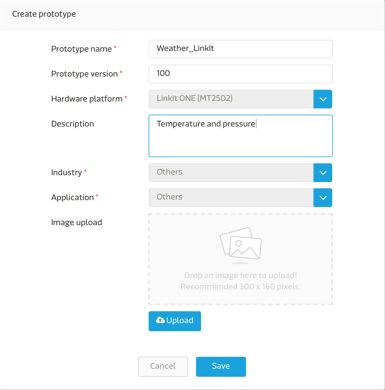
Call the Development menu and press Create Prototype.

Provide the name and version, select the platform —here LinkIt One—, choose an industry and an application. Click on Save.
​
  • Add channels

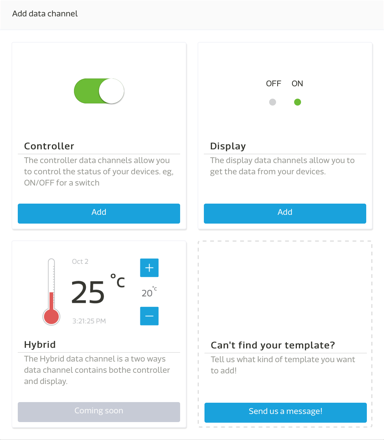
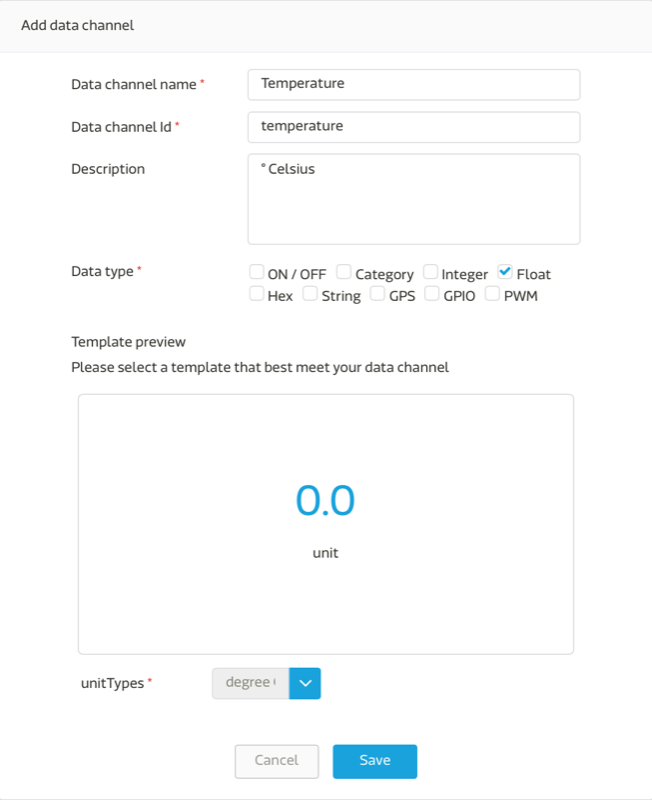
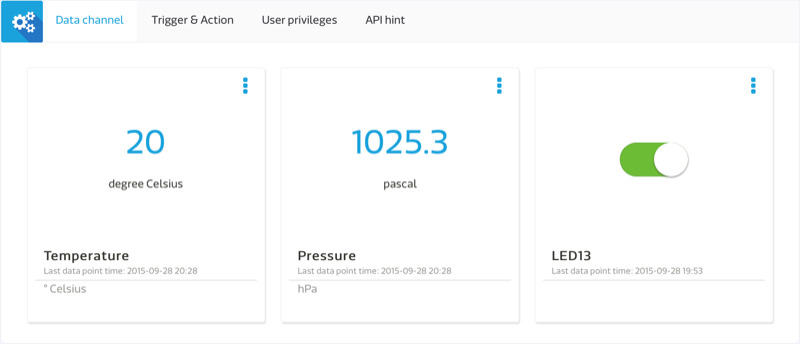
Select Prototype Details and press Add Data Channel.

Each channel corresponds to a data stream. There are currently two widgets available.
​
Picture
Picture
Channels can work on either direction.

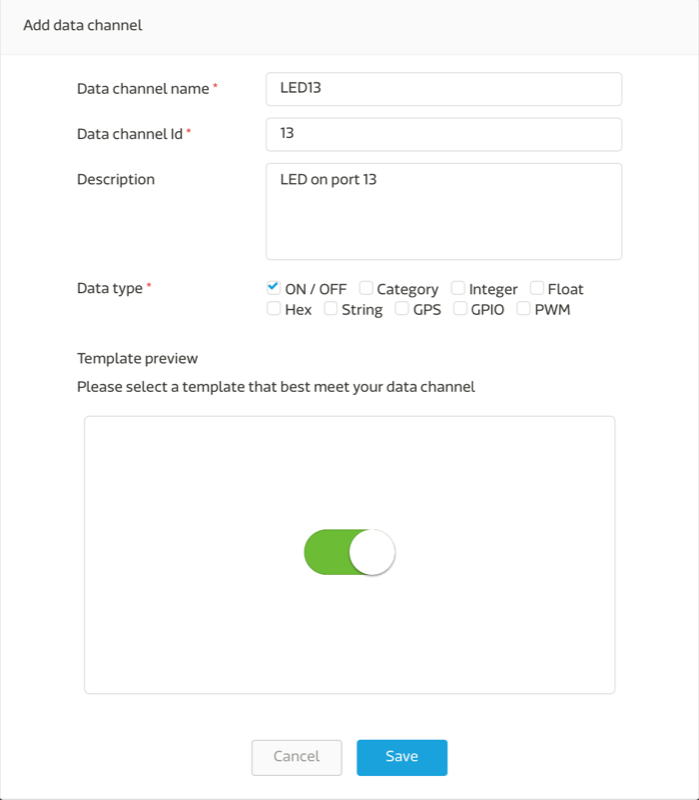
The first widget sends data to the board, and the second retrieves data from the board. More widgets are under development.

Enter the name, the ID and select the data type and the unit. Click on Save.
​
Picture
Picture
  • Create a device

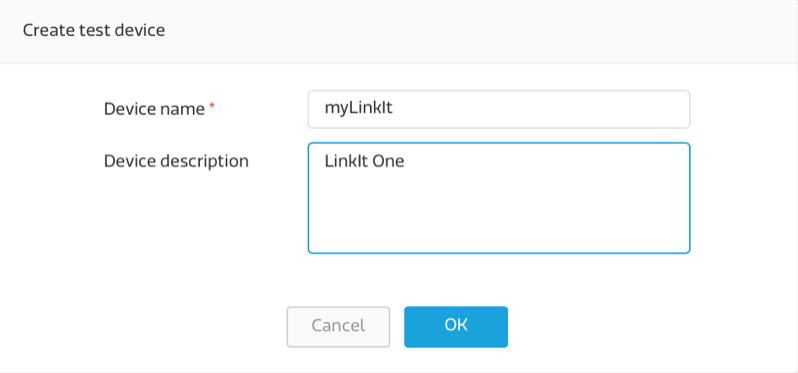
Once the prototype and the channels have been defined, create a device. Click on Create a device, provide a name and confirm by OK.

Note the device ID and key. Up to 10 devices can be defined.
Picture

​Program the Device

  • Write the sketch

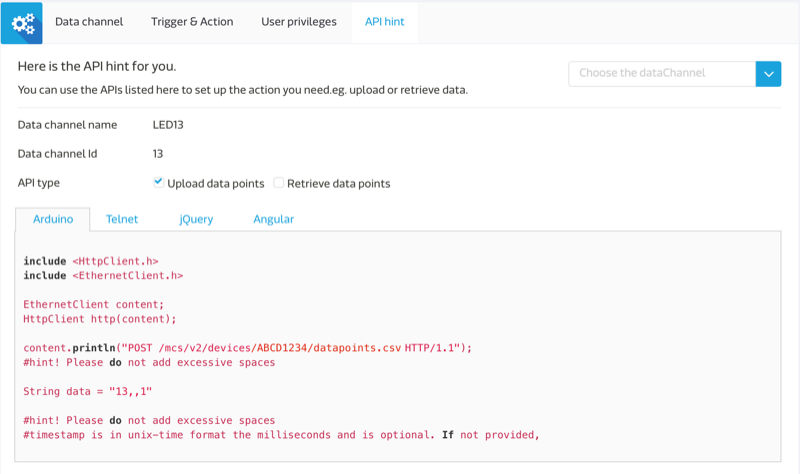
Based on all the parameters defined, code snippets are available for each channel for Arduino and other environments. However, the Arduino snippet differs from the code included in the example. 
​
Surprisingly, MediaTek doesn't provide the HTTP client library required for sending data to the MediaTek Cloud Sandbox. It needs to be downloaded separately.
​
Picture

Send and Display Data

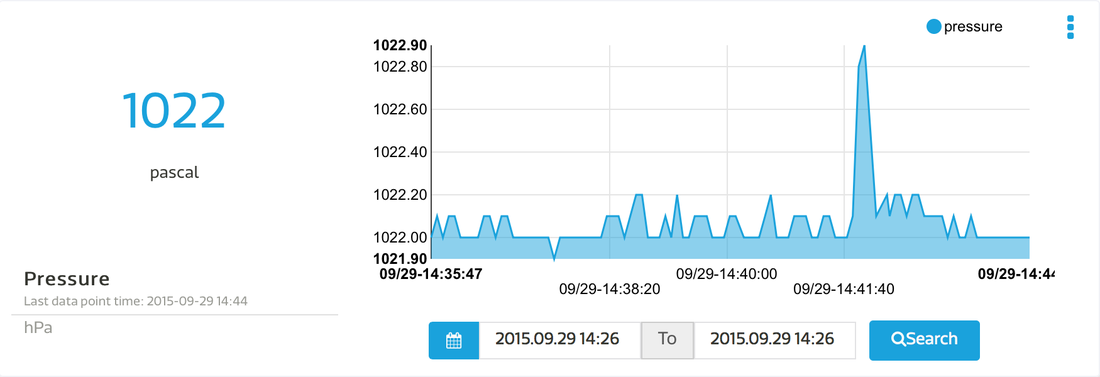
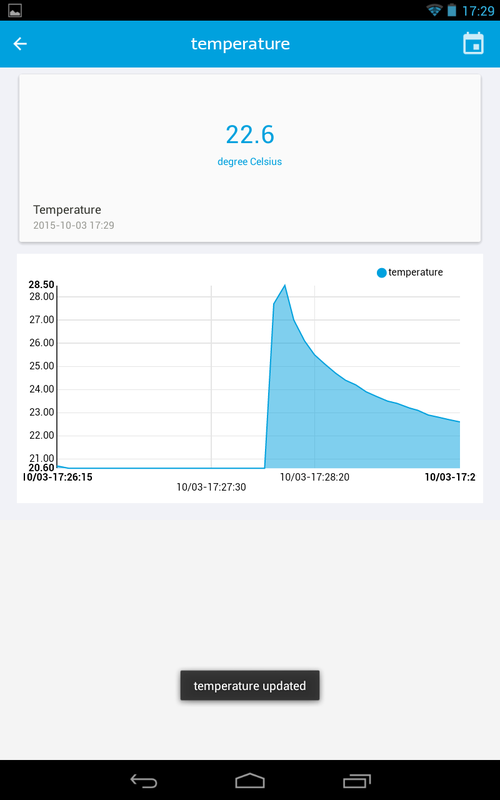
There are two available display modes, one for the last data received and another for the history.

However, data collected collected form the sensor contained erroneous values, as 106,5 °C or 1250.3 hPa. Actually, the LinkIt One MCU was going too fast for the sensor, so the library needed to be adapted. Adding a delay(10); fixed the issue.

Picture
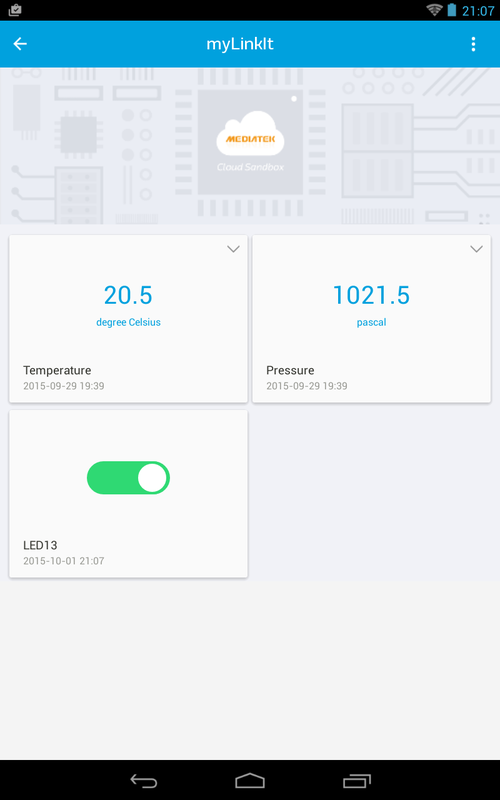
MediaTek offers also Cloud Sandbox, an app for Android, to display the data.

The app features the same two modes, one for the last data received and another for the history.
​
Picture
Picture
Picture

Conclusion

I liked the clear interface and organisation of this cloud solution.

Although the choice of widgets is limited to 2, both work efficiently. The only detail to improve is the supplied code, which needs some polishing.

The app for Android works fine. Let's expect the same app is coming for iOS!
Picture

Pros

  • Well explained tutorial
  • Bi-directional widgets

Cons

  • Key library to be downloaded separately

Wrap-Up

  • Clear interface
  • Android app
  • Some polishing required

Links

  • MediaTek Labs website
  • MediaTek Cloud Sandbox website
  • Weather Station Tutorial
  • Cloud Sandbox Android app
Picture
Powered by Create your own unique website with customizable templates.