Embedded Computing
  • About
  • Blog
  • Hardware
    • Which Platform?
    • Controller Platforms >
      • Adafruit Platform
      • Arduino Plaform
      • BBC micro:bit
      • Espressif Platform >
        • ESP32-DevKitM-2 Board
      • LaunchPad Plaform
      • Microsoft Azure IoT DevKit
      • Raspberry Pi Platform
      • Seeeduino Platform
      • Teensy Plaform
    • Computer Platforms >
      • BeagleBone Platform
      • Mediatek Platform
      • UDOO Platform
    • Peripherals >
      • BoosterPacks for LaunchPads
      • Shields
      • Grove System
      • Sensors
      • Actuators
    • Displays >
      • E-Paper Displays
      • Reflective Displays
      • TFT Displays
      • LCD Displays
    • Legacy Platforms >
      • chipKIT Plaform >
        • chipKIT Uno32 and uC32
        • chipKIT WF32 and WiFire
        • Compatibility
        • chipKIT PGM Programmer-Debugger
        • 4D Systems PICadillo-35T
        • Shields for chipKIT Uno32
        • 4D Systems Platform >
          • 4D Systems PICadillo-35T
          • 4D Systems gen4-IoD-28T
      • Cosa, an Alternative Framework for AVR Boards
      • DFRobot Platform >
        • DFRobot BLuno
        • DFRobot Wido
      • Digistump Platform >
        • Digispark
        • Oak
      • Intel Platform >
        • Intel Curie with Neural Network
        • Intel Edison
      • LightBlue Bean
      • Little Robot Friends
      • Maple Plaform >
        • LeafLabs Maple
      • Microduino Plaform >
        • Microduino
      • Particle Platform >
        • Particle Core
        • Particle Photon
        • Particle Tools
      • Protostack Platform >
        • Protostack Boards
      • RedBear Platform >
        • RedBearLab CC3200
        • RedBearLab WiFi Mini
        • RedBear Duo
      • Wiring Plaform >
        • Wiring S
        • Wiring Play Shield
  • Software
    • Exploring RTOS with Galaxia >
      • Event Library
      • Semaphore Library
      • Mailbox Library
      • Timer Library
      • Clock Library
      • SWI Library
      • Task Library
    • Ultra-Low Power with EnergyTrace >
      • Ultra-Low Power with MSP430
      • Ultra-Low Power with Energia MT and Galaxia
    • Using Integers Instead of Reals
  • IoT
    • IoT Platforms: Which Hardware?
    • IoT Services: Which Solution? >
      • Recommended IoT Solutions
      • Platform-Specific IoT Solutions
      • Other IoT Solutions
      • Not tested IoT Solutions
      • Notification Solutions
    • Get Date and Time from Internet with NTP
    • Fast and Easy WiFi Connection with QR-Code
  • Tools
    • How to Start?
    • Reference >
      • Asking for Help
      • Boards Pins Maps
      • Ruler
      • Boards and Plugs
      • I²C Logic Level Converter
      • Standards for Connectors
    • Training >
      • Texas Instruments Workshops
      • Embedded Systems: Shape The World — MOOC edX UTAustinX UT.6.02x
      • Embedded Systems - Shape The World: Microcontroller Input/Output — MOOC edX UTAustinX UT.6.10x
      • Embedded Systems - Shape The World: Multi-Threaded Interfacing — MOOC edX UTAustinX UT.6.20x
      • Real-Time Bluetooth Networks: Shape the World — MOOC edX UTAustinX UT.RTBN.12.01x
      • Systems Thinking with Texas Instruments Robotics System Learning Kit
    • Books >
      • Getting Started with the MSP430 LaunchPad
      • Getting Started with Arduino
      • Arduino Cookbook
    • IDE >
      • The Battle of IDEs >
        • Arduino IDE 2.0
      • More Options
      • Assessing the Next Generation of IDEs
      • Tools for Documentation
    • Equipment >
      • Saleae Logic Analyser
      • Rigol DS1102E Oscilloscope
      • XDS110 Debug Probe with EnergyTrace​
      • Segger J-Link Programmer-Debugger
      • Nordic Power Profiler Kit II
  • Projects
    • Libraries >
      • Master I²C Software Library
      • Date and Time Library
      • highView Library Suite
      • Others Libraries
    • smartDevices >
      • I²C smartColours Smart Sensor
      • I²C smartRFID Smart Sensor
      • I²C smartLED Display
      • I²C smartControls Smart Device
      • I²C smartWiFi Smart Device
      • I²C smartBLE Smart Device
      • I²C smartNode Smart Device
    • IoT Projects >
      • Remote e-Paper Pictures Panel
      • Remote e-Paper Messages Panel
      • Industrial IoT Project
      • Remote Contactless Temperature Monitor
      • Using Node-RED for IIoT
      • Low Power Home Network Weather Monitoring
      • Updated Low Power Home Network Weather Monitoring
      • Weather and Security Station with Blynk
      • SensorTag to Blynk Using Node-RED
      • Pervasive Reporting
    • AI Projects >
      • Colour Recognition with Neural Network
    • Other Projects >
      • Driving a Large E-Paper Display with a Compact Xiao RP2040
      • Low-Power E-Paper Weather Station
      • Portable Particulate​ Matter Monitor
      • FRAM-based E-Paper Screen Controller
      • General Purpose 3.5" Screen
      • Colour Recognition with Neural Network
      • A Low Power Weather Station
      • Digital Volt-Amp-Watt Meter
      • Mobile Measurement with LCD Display
      • Screen with SRAM for GUI
      • Volt-Amp-Watt-Meter for Grove
      • Multi-Touch Project with CapTIvate

CapTIvate Development Kit

The CapTIvate MCU Development Kit is a complete set to evaluate the MSP430FR2633 MCU and the capacitive touch.

It can be used as a stand-alone board or as a BoosterPack.
​
Picture

Hardware

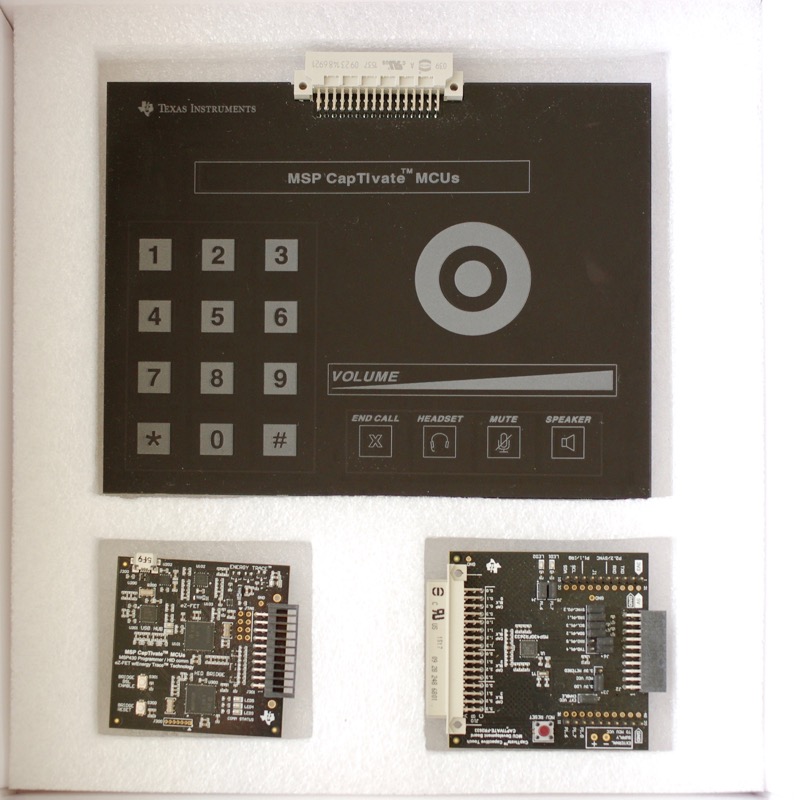
The box is impressive and contains:
  • the main board with the MSP430FR2633 MCU,
  • the programmer board with USB,
  • the isolation board,
  • a USB cable,
and three capacitive boards:
  • a board the OOTB demo with 8 buttons, a slider and a wheel,
  • a proximity detection board,
  • a phone board.​
Each board is packed in an anti-static bag.
​
Picture
Picture
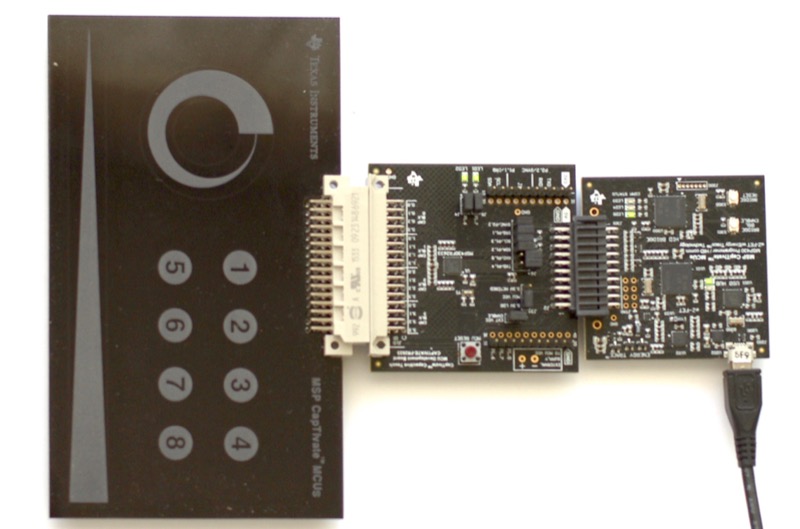
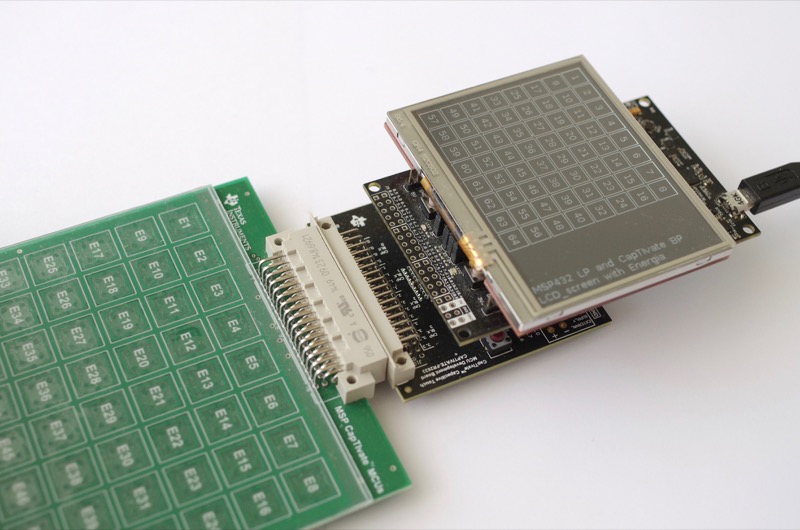
The main board features a MSP430FR2633 MCU and the phone capacitive phone board comes with a haptic feed-back.​

​The board can also be used as a BoosterPack.

​In that case, one needs to solder 20 pins and develop a library so the master can read and process the data from the MSP430FR2633 board.

Software

The main software is the CapTIvate Design Center GUI, available for Windows, Linux and macOS.
  • Design the capacitive board, 
  • Configure the MSP430FR2633, and  
  • Generate the code.

Configuring a capacitive board is very easy thanks to the automatic options, one for assigning the I/O and another for generating the code. 

The code is then compiled on CCS and uploaded to the CapTIvate board.

Project

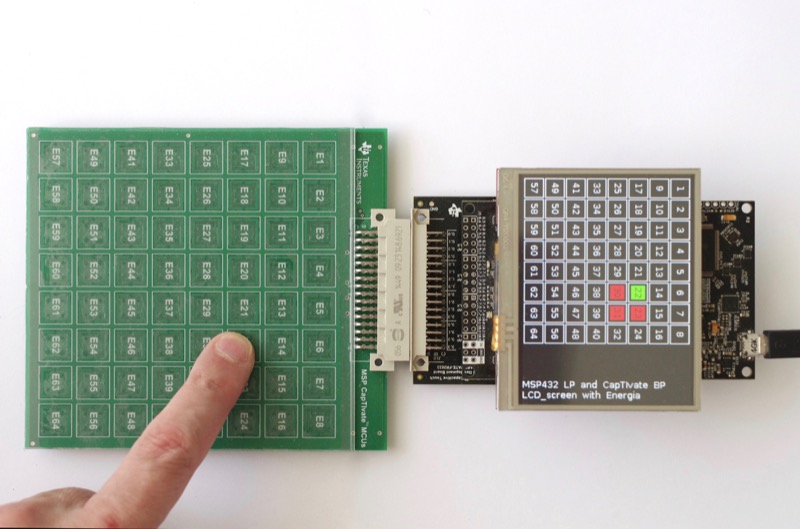
The three capacitive boards provided with the development kit are rather specific. I wanted a more generic example I could use with different projects, like a board with 8 x 8 pads for a calculator.

I went through the three steps on the CapTIvate Design Center GUI. I asked for automatic assignation and then tuned the ports based on the schematics. The code generated for the sensor MCU compiled and ran on the first try on the board turned BoosterPack.

The CapTIvate board rises an interrupt on pin 8 and sends the messages in bulk, through UART or I²C. There's another option for I²C, register mode, but it isn't implemented yet. I chose the I²C bulk protocol.

There are five kinds of messages called packets: the Cycle, Sensor, TrackPad, and General Purpose Packets are unidirectional (from the board to the master) while the Parameter Packets are bidirectional.

The only challenge was developing the library to decode the messages on the master MCU. The Technology Guide provided all the information needed. The critical chapter is the Communication Module, and describes how the messages are configured. All the messages use only one format, the Cycle Packet. This eases reading and decoding. 

​A logic analyser was very helpful!

On the final result, pads with proximity are in orange and pads with touch are in green. I put my left hand on the capacitive board: the board detected 8 pads with touch and 7 pads with proximity.

Learn more about project at the page Multi-Touch Project with CapTIvate.
Picture
Picture

Pins Map

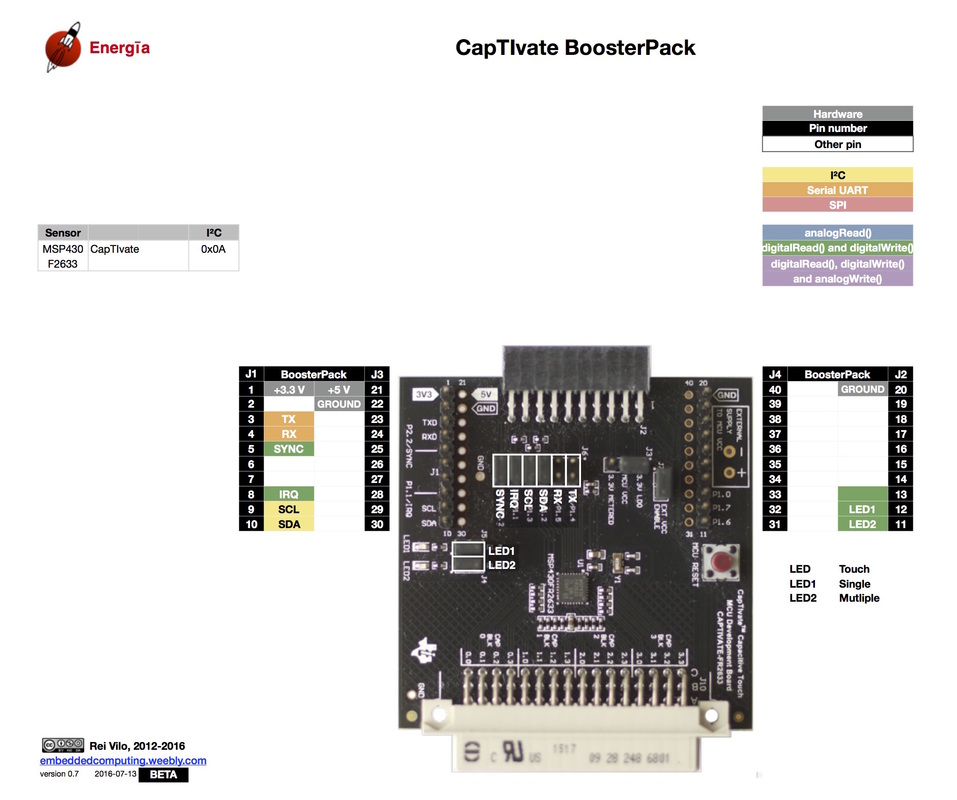
This is the pins map for the CapTIvate board turned into a BoosterPack.
Picture

Conclusion

The CapTIvate is very efficient in sorting signal from noise, and touch from proximity. The evaluation kit is a clear example of a programmable sensor, with all the tools to customise the MSP430FR2633 to fit specific needs. 

As a programmable sensor, software is key. The flow of data is very wordy and requires fast decoding. I expect the register option to reduce the flow of data but it isn't available yet. Similarly, the CapTIvate Design Center GUI generates the code for the sensor but I wish it could write the library for the master as well.

I really like this bundle. Texas Instruments provides an excellent bundle of hardware, software and documentation. There's even a Workshop (Getting Started)!
Picture

Pros

  • GUI to configure the sensor and generate the code
  • Documentation, including "getting started" workshop
  • Three capacitive boards on the kit

Cons

  • Bulk mode only
  • The GUI doesn't generate the code for the master

Wrap-Up

  • A configurable sensor
  • Excellent documentation

Links

  • CapTIvate landing page
  • Hardware
  • Software
  • Technology Guide
Picture
Powered by Create your own unique website with customizable templates.