Embedded Computing
  • About
  • Blog
  • Hardware
    • Which Platform?
    • Controller Platforms >
      • Adafruit Platform
      • Arduino Plaform
      • BBC micro:bit
      • Espressif Platform
      • iLabs Platform
      • Raspberry Pi Platform (MCU)
      • Seeed Platform
      • Silicon Labs Platform
      • Teensy Plaform
    • Computer Platforms >
      • BeagleBone Platform
      • Raspberry Pi Platform (SBC)
      • UDOO Platform
    • Peripherals >
      • Shields
      • Grove System
      • Sensors
      • Actuators
    • Displays >
      • E-Paper Displays
      • Reflective Displays
      • TFT Displays
      • LCD Displays
    • Legacy Platforms >
      • chipKIT Plaform
      • 4D Systems Platform
      • Intel Platform
      • LaunchPad Plaform
      • BoosterPacks for LaunchPads
      • LightBlue Bean
      • Maple Plaform
      • Mediatek Platform
      • Microsoft Azure IoT DevKit
      • Particle Platform
  • Software
    • Exploring RTOS with Galaxia >
      • Event Library
      • Semaphore Library
      • Mailbox Library
      • Timer Library
      • Clock Library
      • SWI Library
      • Task Library
    • Ultra-Low Power with EnergyTrace >
      • Ultra-Low Power with MSP430
      • Ultra-Low Power with Energia MT and Galaxia
    • Using Integers Instead of Reals
    • Going Python?
  • IoT
    • IoT Platforms: Which Hardware? >
      • Matter with Silicon Labs MG24
    • IoT Services: Which Solution? >
      • Recommended IoT Solutions
      • Platform-Specific IoT Solutions
      • Other IoT Solutions
      • Not tested IoT Solutions
      • Notification Solutions
    • Get Date and Time from Internet with NTP
    • Fast and Easy WiFi Connection with QR-Code
  • Tools
    • How to Start?
    • Reference >
      • Asking for Help
      • Boards Pins Maps
      • Ruler
      • Boards and Plugs
      • I²C Logic Level Converter
      • Standards for Connectors
    • Training >
      • Texas Instruments Workshops
      • Embedded Systems: Shape The World — MOOC edX UTAustinX UT.6.02x
      • Embedded Systems - Shape The World: Microcontroller Input/Output — MOOC edX UTAustinX UT.6.10x
      • Embedded Systems - Shape The World: Multi-Threaded Interfacing — MOOC edX UTAustinX UT.6.20x
      • Real-Time Bluetooth Networks: Shape the World — MOOC edX UTAustinX UT.RTBN.12.01x
      • Systems Thinking with Texas Instruments Robotics System Learning Kit
    • Books >
      • Getting Started with the MSP430 LaunchPad
      • Getting Started with Arduino
      • Arduino Cookbook
    • IDE >
      • The Battle of IDEs
      • More Options
      • Assessing the Next Generation of IDEs
      • Tools for Documentation
    • Equipment >
      • Saleae Logic Analyser
      • Rigol DS1102E Oscilloscope
      • XDS110 Debug Probe with EnergyTrace​
      • Segger J-Link Programmer-Debugger
      • Nordic Power Profiler Kit II
  • Projects
    • Libraries >
      • Master I²C Software Library
      • Date and Time Library
      • highView Library Suite
      • Others Libraries
    • smartDevices >
      • I²C smartColours Smart Sensor
      • I²C smartRFID Smart Sensor
      • I²C smartLED Display
      • I²C smartControls Smart Device
      • I²C smartWiFi Smart Device
      • I²C smartBLE Smart Device
      • I²C smartNode Smart Device
    • IoT Projects >
      • Remote E-Paper Weather and Message Board
      • Typie-Walkie with LoRa and E-Paper Screen
      • Typie-Walkie with E-Paper Screen
      • Remote e-Paper Pictures Panel
      • Remote e-Paper Messages Panel
      • Industrial IoT Project
      • Remote Contactless Temperature Monitor
      • Using Node-RED for IIoT
      • Low Power Home Network Weather Monitoring
      • Updated Low Power Home Network Weather Monitoring
      • Weather and Security Station with Blynk
      • SensorTag to Blynk Using Node-RED
      • Pervasive Reporting
    • AI Projects >
      • Colour Recognition with Neural Network
    • Other Projects >
      • Air Quality Monitoring
      • Driving a Large E-Paper Display with a Compact Xiao RP2040
      • Low-Power E-Paper Weather Station
      • Portable Particulate​ Matter Monitor
      • FRAM-based E-Paper Screen Controller
      • General Purpose 3.5" Screen
      • Colour Recognition with Neural Network
      • A Low Power Weather Station
      • Digital Volt-Amp-Watt Meter
      • Mobile Measurement with LCD Display
      • Screen with SRAM for GUI
      • Volt-Amp-Watt-Meter for Grove
      • Multi-Touch Project with CapTIvate

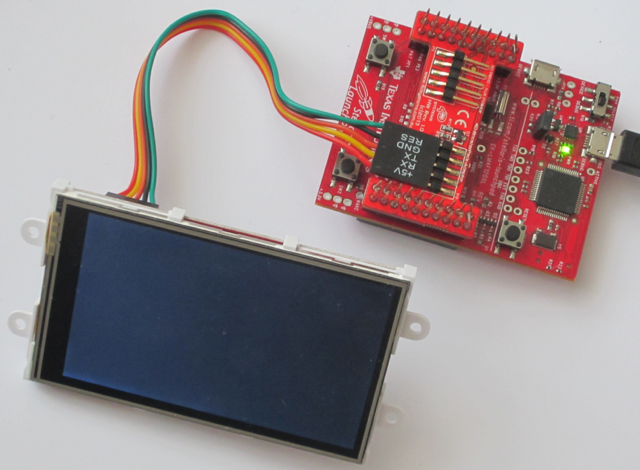
4D Systems uLCD-32WPTU with BoosterPack for Stellaris

I received the 4D Systems uLCD-32WPTU screen and the BoosterPack from the 43oh.com forum when I answered to the call for Coders needed - Free Hardware.

Photo
This 3.2" Color LCD with Touch and SD-Card BoosterPack for Stellaris from 4D Systems features a 3.2" 400 x 240 pixels screen with 256K colours, touch, speaker and micro-SD card slot. 

It comes with a BoosterPack for the Stellaris LaunchPad.


Picture
The pins of the two connectors on the BoosterPack —one for the screen and another for the programming cables— aren't labelled, not even the ground, making the connections adventurous. 

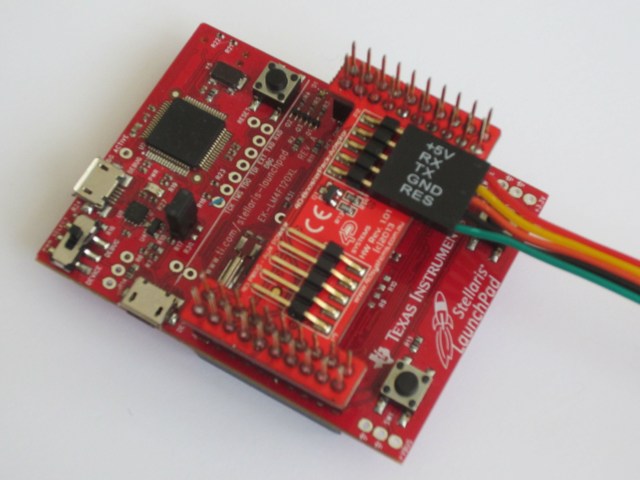
I had to test the +5V and ground pins individually to find the right connection.

Unfortunately with Energia, the BoosterPack relies on the PB_0 / PB_1 or 3 / 4 pins for Serial1, whilst the correct pins are PC_4 / PC_5 or 37 / 36 pins on the Stellaris LaunchPad.

The pins map is available at 4D Systems BoosterPack Adaptor.
Picture
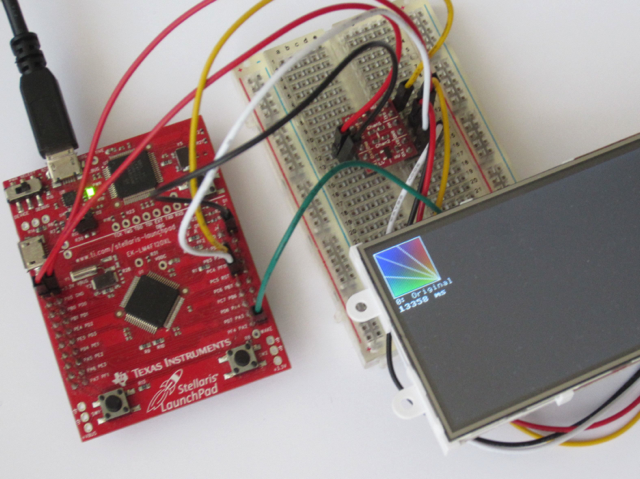
However, I managed to connect it successfully using the PC_4 / PC_5  or 37 / 36 pins and a logic level converter. 

I recommend placing a logic level converter --pictured right— for the serial RX/TX lines to obtain a better signal at high speed. 

The Stellaris LaunchPad operates at 3.3V, but the screen requires 5V and 150 mA in normal usage. Power consumption can go even higher if the speaker is used, typically ~220 mA.

The major benefit is that only two pins, serial RX and TX, are required for managing all the components, including LCD, touch, speaker and SD-card.

The screen also includes the fonts, but not the extended ASCII characters required by European languages —as àéêëèùñæœ...

Picture
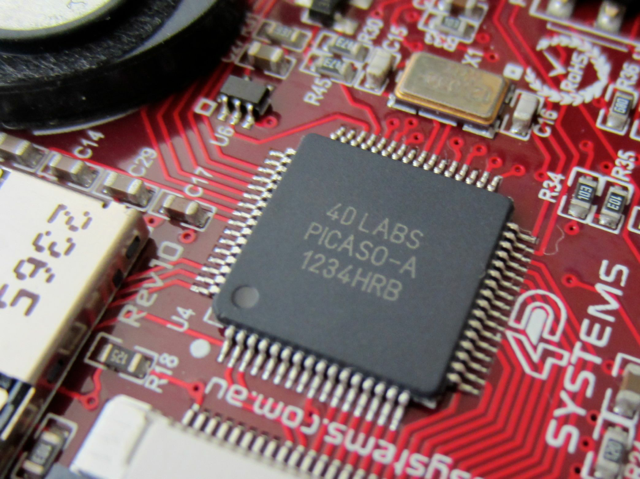
The module uses a proprietary GCU, called Picaso, to manage all the components. It is driven by a set of serial commands, called SPE2.

The screen module and the BoosterPack are carefully manufactured and very clean. 

As usual, 4D Systems provides excellent documentation for the screen and for the serial commands, as well as many application notes.

Picture

Performance

Thanks to its embedded GCU, writing to and reading from the screen are really fast.

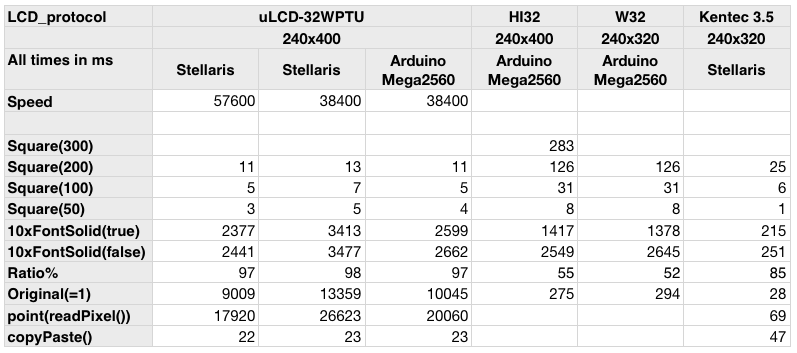
Copying and pasting a 64x64 area needs 22 ms instead of 47 ms for the 8-bit parallel Kentec 3.5" screen or 438 ms for the SPI-connected HY28A.


Click to enlarge
Picture
The screen offers different modes: 
  • the screen acts as a slave in serial mode,
  • the screen acts as an independent system with the GCU acting as a MCU in Designer and ViSi modes,
  • the screen acts as an independent system in charge of HMI in ViSi-Genie mode.

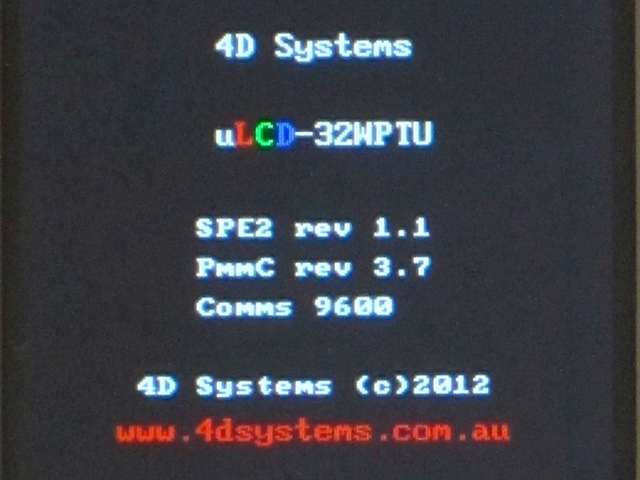
On the right, the splash screen shows different releases:
  • PmmC for the firmware of the screen, here 3.7, and
  • SPE2 for the application to turn the screen into serial mode, here 1.1.

Both can be updated.
Picture

Library for Serial Mode SPE2

The new serial protocol, called SPE2, isn't compatible with the previous one, SGC, used in the Serial_LCD Library Suite. 

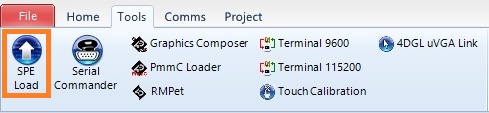
To use SPE2, a program needs to be loaded to the screen:
  • Select the port under the Comms menu, here COM4, and then 
  • Press SPE Load under the Tools menu. 

Unfortunately, those tools are only available for Windows.

4D Systems does provide a library for Arduino but, unfortunately, I didn't manage to get it working. It crashed on both the Arduino Mega2560 and the Stellaris LaunchPad.

So the only solution was to start from scratch.

As always, the documentation provided by 4D Systems is excellent, well written, clear and accurate. 
Picture
Picture

For Energia, I've adapted the screen-specific functions to fit into the LCD_screen Library Suite.

This LCD_screen Library Suite includes high level graphics and GUI elements.
Picture

Pricing

At USD 85 or even USD 125 with accessories, the screen is expensive: 10 times the cost of the LaunchPad Stellaris!

As discussed in the From Serial_LCD to LCD_screen introduction, the sceen seems over-priced for a basic usage and requires a careful price arbitration on total cost of board and screen.
Picture

ViSi-Genie Mode

However, the screen really delivers its true potential when it is used as an independent system, with the GCU acting as a MCU. The screen module can be used as:
  • a full development board, with I/Os and standard ports, or 
  • an self-contained graphic interface module to be connected to the LaunchPad.

I'm not going to discuss the first option here. The board provides 14 KB of flash and 14 KB or RAM, 13 GPIOs, PWM for sound, 2 UARTs and one I²C port, alas in master mode only. 

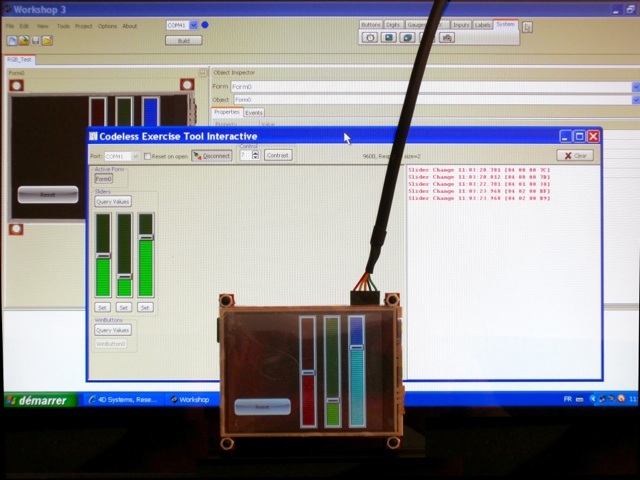
The second option is far more interesting, with unparalleled ease of use and perfect flexibility brought by the ViSi-Genie environment for the rapid application development of an elaborate human machine interface.

This amazing new tool is called ViSi-Genie. It is only available on Windows. 
  • The human machine interface is designed on the PC with a graphic user interface. Just click-and-drag to add elements like buttons, gauges, video player and more.
  • The resulting program is compiled and uploaded directly to the screen and working files saved on a SD-card.
  • The screen acts as an independent system in charge of the whole human machine interface and communicates through serial to the main controller.

So the LaunchPad Stellaris and its program can focus on I/Os management, data acquisition and processing. The LaunchPad Stellaris sends commands to and read answers from the screen module to manage interaction with the end-user.
Photo

Pros

  • All-in-one screen
  • Only two pins required, TX and RX
  • LCD_screen Library Suite for Energia
  • Excellent documentation
  • Powerful dedicated system for Human Machine Interface with ViSi-Genie

Cons

  • Expensive for basic usage
  • Workshop IDE and tools are Windows only, no Linux and no Mac OS X support
  • No extended characters in fonts

Wrap-Up

  • Powerful module with screen, touch and SD-card
  • Excellent documentation
  • Interesting ViSi-Genie mode for Human Machine Interface
  • Price arbitration on total cost of board and screen vs. intended usage

Links

  • 4D Systems uLCD-32WPTU product page
  • Picaso Serial Command Set Reference Manual
  • Official 4D Systems Arduino Serial Library at GitHub
  • New LCD_screen Library Suite for Energia
  • 43oh forum


Picture
Powered by Create your own unique website with customizable templates.